Sunday, March 17, 2024
Deepfake Audio
For decades, it has been confusing for people to know if they should trust what they see. From the moment that Photoshop became a verb, it had been well known that pictures could be “doctored” to alter one’s perception of reality. In the past few years, artificial intelligence (AI) could be applied to alter videos as well.
Recently deepfake audio was in the news because of a fake robocall in which Joe Biden’s voice was digitally impersonated in an attempt to suppress New Hampshire democrats from voting. Do you think you can tell the difference between an authentic audio clip and one that has been digitally created through AI? Fortunately there is ongoing research that uses AI to help detect AI-powered voice cloning.
Saturday, April 8, 2023
Make Your Tesla Fart
I discovered a “Fart” feature on my Tesla app, as pictured on the upper right corner of the icon library (whose icons can be repositioned):
Tapping the “Fart” icon results in the Tesla playing a variety of fart noises through its exterior speakers. Some are short, and some are long, but all of them are entertaining. Similar to eating Lay’s potato chips, nobody can resist the urge to tap the icon just once.
In 2021, Tesla featured a pretty extensive fart menu in Emissions Testing Mode. It featured 6 different fart sounds that could be triggered on demand or when using the turn signal. Apparently it could also be instructed to play the sound from a specific seat.
In 2022, Tesla allowed users to replace its horn with fart and other noises with its ‘Boombox’ feature and was ordered by the National Highway Traffic Safety Administration to disable those noises because pedestrians are less likely to be able to hear them. Details are provided in this CNN story and NHTSA Safety Recall Report.
The current fart noise feature does not replace the horn sound so does not compromise the pedestrian warning system. If you’re like me, you’ll appreciate that there is now a safe and legal way to make your Tesla fart. Now if you’ll excuse me, I need to light a match.
Wednesday, January 12, 2022
Convert and Play Apple System 7 Sounds
The other day I stumbled across some items in my closet that probably belong in a computer museum: a 3.5-inch floppy drive (with a USB cable) and a collection of 3.5-inch floppy diskettes dating back to when I used a Mac Classic II in college. Among these old documents I found one diskette that was filled to its 1.4 MB capacity with sound files. The files did not have any extensions, and their icons in macOS Mojave 10.14.6 look like this:
Double-clicking the files did not play the sounds, so I tried to append common file extensions like .wav and .aiff to see if the macOS Finder or VLC would play the sounds, but that didn’t work. That is because those sound files were created in Apple System 7, and the actual sounds were stored in the resource fork where modern macOS applications no longer use this approach.
I found a handy donationware application called SystemSound which can convert System 7 sounds to AIFF or WAVE formats. It also includes an extension that allows you to play System 7 sound files natively in Mac OS X. SystemSound runs on Mac OS X 10.3.9 or later and is free. It worked like a charm, and here is what the user interface looks like:
I found a other approaches to extracting System 7 sounds that I did not test. One of them is an application called File Juicer, and other approaches are discussed in this thread. I hope this helps you make use of your System 7 sound files.
Monday, January 18, 2021
An Adventure in Updating Headphone Firmware
I recently received a set of Razer Opus Bluetooth-enabled headphones. The first time I turned them on, my iPhone 12 ProMax immediately detected the headphones via Bluetooth and successfully paired. The combination of over-ear cup design and active noise cancellation provides a rich audio experience.
When later attempting to pair the headphones with my 2012 iMac and 2016 MacBook Pro, neither computer was detecting the headphones, even when disconnecting and forgetting the Razer Opus on my iPhone and shutting down the headphones and turning them back on.
I read in the instruction manual about the Razer Opus iOS app, so I decided to see if that would help me solve my Bluetooth pairing woes. Note that Razer has different iOS apps for different audio devices, so make sure you download the correct app. Anyway, upon launching the app, you are asked to select your headphone model to initiate paring. After pairing, the Razer Opus app informed me that there was a firmware update available. I thought that maybe this firmware update would enable my headphones to pair with my iMac or MacBook Pro. I proceeded to download the firmware update, and so my adventure began.
For the next 10 minutes or so, I watched the “Uploading to Device” progress bar crawl from 0 to 100%. When complete, the progress bar changed into a “Ready to Install” button. After selecting “Ready to Install”, I was notified that I should charge the Opus to at least 75% before installing the firmware update. So I put my update on hold momentarily while I charged the Opus for the next hour or so to get the battery level above 75%. Then I was able to initiate the firmware update.
During the firmware update, the app clearly told me not to turn off the headphones or mobile device during installation. I had my device in low power mode, even though my battery level was 85%, so the phone screen kept dimming every few seconds. I dutifully babysat my phone and periodically tapped on the screen so as to not let the phone go to sleep. However, the process was taking a long time, and on one occasion the phone went to sleep and might have dropped the Bluetooth connection because the indicator light on the headphone turned off completely. I never saw it blink green as the app said it would do when the update had finished. I knew that you should never interrupt a firmware update, as it could brick your device. My worst fears came true when I tried unsuccessfully to pair the Opus with my iPhone.
Upon re-launching the Razer Opus app, it automatically began re-downloading the firmware update, so this indicated to me that I did in fact interrupt the firmware update, but at the same time it gave me hope that I could simply re-apply the firmware update and get the headphones functioning again. Strangely, on the second installation attempt, while the download process took about 10 minutes (similar to my first attempt), the actual installation process lasted only a few seconds, after which it said the firmware was installed. However, I was still unable to pair the headphones.
I turned off the headphones, force-quit the iOS Opus app, and tried to install the firmware a 3rd time. Once again, the download process took about 10 minutes, and the firmware installation lasted a little bit longer this time, perhaps 30 seconds or so. For the 2nd time, it said that the firmware was installed. Cautiously optimistic, I tried to pair the headphones with my iPhone but to no avail. By this time, I assumed that I had effectively bricked the headphones.
For whatever reason, I decided to long-press the power button on the headphones, and this time my iMac detected the Razer Opus device via Bluetooth, successfully paired, and was able to stream audio. In retrospect, it seems like if you want to use the Opus headphones on multiple devices, you have to long-press the power button to re-initiate a pairing request. Maybe it didn’t need a firmware update after all, and I could have paired with my iMac and MacBook Pro had I simply known to long-press the power button.
I re-read the instruction manual (it is brief), and nowhere does it describe how to pair the headset with multiple devices. So I learned 3 important lessons today. The first is to make sure that you don’t interrupt a firmware update (I already knew that, but I’m counting it as a lesson learned anyway). Second, if installing a firmware update from your narcoleptic phone, you need to tap on it periodically to keep it awake. Third, if you want to use your Razer Opus on multiple devices, it appears that you have to long-press the power button to re-initiate a pairing request. Hope this helps prevent you from bricking your brand new headphones.
Sunday, January 10, 2021
AirPods Pro Ear Tip Fit Test
I just learned that my left ear canal is larger than my right ear canal. You see, I recently got my hands on a set of AirPods Pro and have been using them for a few weeks. One of the features of AirPods Pro is noise cancellation, and to optimize that, it is helpful to make sure the ear tips fit snugly in your ear canals.
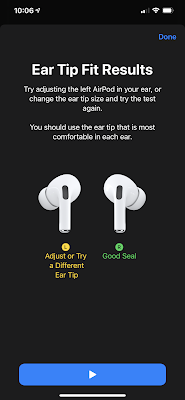
Apple provides small, medium, and large ear tips, with the medium size installed by default and the other sizes packaged separately in the box. While the AirPods Pro have been working fine for weeks, it wasn’t until today that I ran the Ear Tip Fit Test by going to Settings > Bluetooth and tapping the info button next to my AirPods Pro. With the medium ear tips on both sides, the Ear Tip Fit Test consistently told me that the left side did not fit well (image on left). I experimented with the small and large ear tips, and I found that with the large ear tips on the left side, I was able to get a good seal (image on right).
Although trivial on the grand scheme of things, Apple taught me something about my body today. Hmmm, interesting!
On a separate note, I noticed that I consistently begin to experience mild soreness in my ear canal after wearing the AirPods Pro for 30-60 minutes. It’s not severe enough that I need to stop using them, but I do notice that they are pressing on my ear canals. On the other hand, I can wear AirPods and EarPods for several hours a day without any discomfort. I’m not sure if I will eventually get used to the AirPods Pro and no longer have discomfort, but right now I feel that they may have a limited role in my headphone usage.
Saturday, May 4, 2019
GoPro HERO7 Black Microphone Port
Although I do have the case and various mounts, most commonly I shoot handheld videos without the casing. In doing so, I have discovered that sometimes I inadvertently cover up the microphone port with my fingers which muffles the sound. Given that the GoPro HERO7 Black is waterproof, I had always assumed incorrectly that the microphone was using the same port as the speakers on the bottom of the camera.
The owner's manual does not show the location of the microphone port, so I searched Google. All of the search results led me to external microphone products or general reviews of the camera. After doing some of my own testing, I discovered that there is a separate microphone port on the side of the camera—it's the tiny hole above the power button, as shown in the upper left portion of this image:
So for those of you who shoot handheld videos with the GoPro HERO7 Black and were wondering the same thing, I hope this helps you too.