Showing posts with label Bambu Lab. Show all posts

Friday, February 13, 2026

3D Printing Without Wi-Fi

Today I was unable to send a print job wirelessly from my Mac to my Bambu Lab A1 3D printer because our Spectrum internet service went down.

I am accustomed to sending print jobs wirelessly to my 3D printer, in fact I have never done it any other way. Because I can turn my iPhone into a hotspot with my Visible Wireless cellular plan, I connected both my laptop and 3D printer to my hotspot. The connection was slow partly because I have the basic plan with 5 Mbps hotspot speeds but also because my 3D printer is located on the first floor where cellular reception is somewhat spotty. It is good enough for phone calls but not so great when it comes to transmitting larger amounts of data.

I sliced my model in Bambu Studio as I normally do. I then sent the print job which normally occurs in 2 phases. First, Bambu Studio uploads the print job from my laptop to Bambu Lab’s cloud service. Second, it downloads the print job from the Bambu Lab cloud to the 3D printer. It slowly but successfully uploaded the 4.1 MB print job to the cloud. However, the 3D printer struggled for a while to download the print job from the cloud and eventually failed.

Therefore, I reverted to the tried and true local printing method via microSD card which bypasses the internet. After slicing my model in Bambu Studio, instead of sending the print job via the cloud, I chose the “Export plate sliced file” option. From there, a “Save sliced file as:” dialog box allowed me to save a .gcode.3mf file. I placed the .gcode.3mf file in the root directory of the microSD card that came with my Bambu Lab A1 3D printer and powered up the printer. After staring up, I pressed the “Print Files” option on the home screen and selected my .gcode.3mf file. From there, I was able to toggle options for AMS, dynamic flow calibration, and bed leveling, just as I would have done when sending a print job from Bambu Studio via cloud printing. It worked like a charm.

With my first 3D printer, a Creality Ender 3 V2 Neo, I printed exclusively via microSD card because it did not offer a wireless option (at least not natively). Although printing via microSD card is not complex, it certainly is more convenient for me to send print jobs wirelessly than to transfer my microSD card between my computer (2nd floor) and 3D printer (1st floor). Some folks have concerns about privacy when sending print jobs through Bambu Lab cloud services, but I have no such concerns because all my prints are for fun and entertainment, and I have nothing to hide. I like the convenience of cloud printing and will appreciate it even more after my Spectrum internet service is restored!

Wednesday, February 11, 2026

3D Model Figurine Generators

I started 3D printing as a hobby in May 2023. At the time, most of my 3D prints were of models that other people created and uploaded to free online repositories such as the ones I’ve described here. I then took the next logical step of learning a CAD application called Tinkercad to create my own simple models. For some specific use cases, I’ve experimented with 3D modeling streets and terrain. Generative artificial intelligence exploded onto the scene in recent years, and now there are many websites that allow users to upload a photo and automatically generate a 3D figurine without knowing anything about mesh modeling of curved surfaces. In this post, I compare 2 free 3D figurine generators: PrintU by Bambu Lab and FanForge by Creality.

As depicted in the image at the top, I uploaded the same photo to PrintU and FanForge and generated 3D models. Both PrintU and FanForge had relatively easy to understand wizard interfaces, and both websites offered variations for how to generate the 3D models. I generated 3 variations in each application, and screenshots of the 3D models are presented below.

As you can see, the 3 models generated by PrintU were far more realistic than the ones generated by FanForge. In fact, the FanForge models did not even remotely match the facial features that were in the uploaded photo. The FanForge models were more “artistic” which could partially explain their deviation from reality, but if the starting point is a bust photo, I have an expectation that the resultant model should bear some resemblance.

I’d have to experiment with additional models generated by different photos before drawing more definitive conclusions, but my initial impression is that PrintU is the clear winner in this head to head comparison.

Sunday, December 21, 2025

Bambu Lab Regains My Loyalty

I recently experienced my second Bambu Lab A1 3D printer malfunction in 13 months, and I started to question the durability of Bambu Lab 3D printers. Bambu Lab Support walked me through the troubleshooting process and sent me a free replacement Power Switch Assembly despite my 3D printer being just outside the 1-year warranty window. I received the part yesterday.

Although the replacement part did not come with an instruction booklet, the QR code on the box directed me to the A1 Power Switch Replacement Guide on the Bambu Lab Wiki. I followed the instructions line by line, and although some of the instructions had awkward wording that made it a little confusing to understand at first, the combination of the written instructions along with pictures made things pretty clear. The estimated time to replace the part was 20 minutes. I spent about twice that much time—I am not accustomed to repairing electronics, but I was able to get the job done. Here is the newly installed power switch assembly on the upper right, with the ground cable secured in place on the far left.

Here is where the cables from the power switch thread through a narrow trough to the compartment where the power supply is located. The wiki states, “Note: In the new version of the A1 power switch, we have optimized the cable layout by removing the intermediate ground wire connector to the AC board. Functional and safety tests have verified that this change does not affect the normal operation of the power switch or the overall system, while also reducing the number of connection points and improving the reliability and simplicity of the cable layout.” Hence, the neutral (N) and live (L) wires are connected, but the ground cable of the AC board (PE; protective earth) is intentionally omitted in the replacement power switch assembly.

Finally, I confirmed that there was power going to the 3D printer, as evidenced by the green “OK” indicator on the Bambu Lab Assistant.

After replacing the Power Switch Assembly, I was able to get 6 consecutive 3D prints without power loss. The first 5 prints were small jobs that completed in 20-40 minutes each. The 6th job was a 2.5-hour print, and given these results, I am confident that the printer power loss issue has been fixed.

Although the 3D printer malfunctions are a nuisance, I have to give credit to Bambu Lab for helping me address the problem. First of all, I appreciate the fact that Bambu Lab Support walked me through the appropriate troubleshooting steps. Many companies do not offer detailed troubleshooting and relegate that activity to the third party repair industry or would charge fees to diagnose and repair their products. Second, I appreciate the fact that Bambu Lab Support was able to identify the problem with speed and accuracy. I guess it’s not surprising that Bambu Lab knows their products better than ChatGPT. Third, I appreciate Bambu Lab Support’s flexibility in sending me a replacement part despite my printer falling outside of the 1-year warranty window—I feel that this represents unusually good customer service.

In summary, Bambu Lab lost some of my loyalty to their brand with the 2 malfunctions, but they gained it back with customer support. Thanks Bambu Lab!

Thursday, December 18, 2025

Another Bambu Lab A1 Malfunction

In October 2024, I wrote about my Bambu Lab A1 3D printer heatbed temperature malfunction. Because the malfunction occurred within the 30-day replacement window, I was able to return the printer and have a replacement printer sent to me.

I have had a great experience with my replacement Bambu Lab A1 3D printer until November 2025 when I started witnessing that the printer would randomly lose all power. Sometimes it would happen during the pre-print routines (e.g., bed leveling, bed heating, filament purging), and sometimes it would happen in the middle of a print. Despite the main power switch remaining in the ON position, the printer would lose power, the fans would turn off, the screen would go blank and unresponsive, and the Bambu Studio slicer would lose communication with the printer. Initially this occurred infrequently, but it seemed to occur progressively more frequently over time to the point where most of my prints would fail due to unexpected power loss.

Because of the prior heatbed temperature malfunction in October 2024 and the current power loss malfunction in November 2025, I have started to question the durability of Bambu Lab 3D printers. Nevertheless, I bought another Bambu Lab A1 for three primary reasons. First, I enjoy participating in the Bambub Lab ecosystem where things just work (that is, until my printer breaks down). Second, I have meticulously set up air purifiers both inside and adjacent to my Bambu Lab A1 third party enclosure and didn’t want to re-configure my setup with a different printer’s form factor. I had considered upgrading to the Bambu Lab P2S, but that will have to wait. Third, Bambu Lab was in the midst of their Black Friday sale, and the A1 printer was on sale for $279 (normally $399).

Meanwhile, I asked ChatGPT to help me diagnose the problem, in hopes that maybe I could acquire parts to fix the older printer. After describing my scenario, ChatGPT concluded that there was an 80%+ likelihood that the power supply unit was responsible for the power loss. The other possibilities were a loose power connector (15%), a mainboard power regulator failure (5%), or a firmware or software issue (<1%). It encouraged me to contact Bambu Lab Support and stated that even though my printer was just past the 1-year warranty period, they might still help me out. I had previously written about the Bambu Lab Warranty, and at the time I had focused on the language related to returns, refunds, and replacement within a 30-day window. Looking more closely at the general warranty language dated November 18, 2025, it also says that there is a “2-year warranty for for consumers from the EU, Switzerland, Norway and Iceland” and a “1-year warranty for the rest of the world (any country not mentioned above).”

I submitted a support ticket to Bambu Lab, and they directed me to the Bambu Lab Wiki for “Printer Circuit Failure Troubleshooting - A1”. I confirmed that all indicator lights were in their normal status.

  • The TH Board indicator light was constantly green
  • The MC Board green light blinked every 5 seconds
  • The AP Board had one green light blinking once per second
  • The HMS indicator light was constantly on

Based on questions from Bambu Lab Support, I also confirmed that the fuse was NOT blown, and the power switch had good contacts and no corrosion. Also, I measured the AC power input at terminals #4 (neutral wire) and #5 (live wire) of the power module, and the multimeter reading was 123.8 volts—a normal value in the United States.

Bambu Lab Support asked me if the main power indicator light would turn off when the machine is powered off, and I confirmed that it did. They also asked me to confirm that the 24V power module indicator light was a steady green light (normal state) when the machine is powered on, and I confirmed that it was steady green. They also asked me to verify that connections for terminals #1 through #5 on the power supply were properly inserted, and as far as I could tell, they were. Based on this information, they decided to send me a power switch assembly and noted that despite my printer exceeding the 1-year warranty period, “This component is a special free replacement.”

To me, this gesture from Bambu Lab went a long way toward mitigating my frustration with my 2nd A1 printer malfunction in 13 months. Also, ChatGPT was correct in encouraging me to contact Bambu Lab Support based on a history of them supporting printers past the warranty period. Although I still question the durability of Bambu Lab printers, I must admit that I have received very good support that has exceeded my expectations.

However, one main question remains. Although ChatGPT seemed at least 80% confident that the power supply unit was to blame, Bambu Lab Support sent me a free replacement part for a power switch assembly which ChatGPT suggested was a much less likely culprit. I updated ChatGPT with my recent interactions with Bambu Lab Support and asked if they perhaps wanted to first have me replace the power switch assembly because it was a less expensive part, and ChatGPT agreed with my assessment. It went on to say that it still felt that the power supply was still the most likely culprit and suggested that I replace the power switch assembly as instructed by Bambu Lab Support and see if that fixes my problem. If I still experience power loss after replacing the power switch assembly, then that makes the power supply unit the only remaining rational explanation. ChatGPT communicated to me that this is probably just the normal troubleshooting algorithm they go through. Bambu Lab Support has not commented on their protocol, but the ChatGPT response seems to make logical sense.

So now I anxiously await receipt of my free replacement power switch assembly. I hope it fixes the power loss issue but realistically expect that I may have to reopen the support ticket and ask for further assistance, with possible replacement of the power supply as a result. Stay tuned for what happens next!

Wednesday, November 6, 2024

Bambu Lab Warranty


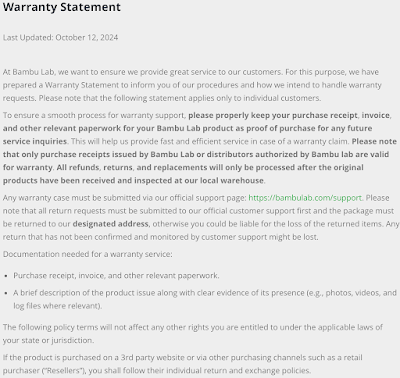
As I mentioned previously, my Bambu Lab A1 experienced a Heatbed Temperature Malfunction which resulted in me getting a replacement A1 Combo. A replacement was offered because my printer was still under warranty, and the warranty is the topic of this blog post. The current Warranty Statement is dated October 12, 2024, and there are general provisions that ask you to keep all of the documentation related to your purchase:

It also says to keep your original packaging box and materials in case you need to return your device:


There is a 14-day Return and Refund Policy which in my opinion is kind of short, but at least there is a policy.

The Replacement Policy is slightly more generous, as you have 30 days:

I was fortunate to have reported my Heatbed Temperature Malfunction to Bambu Lab Customer Support on day 29 after receipt of my A1 Combo, and therefore I was eligible for either replacement or troubleshooting support.

I shipped the defective device to Bambu Lab on 10/15/2024, and I received my replacement A1 Combo 2 weeks later on 10/29/2024. I’ve printed several models with my replacement A1 Combo, and everything seems to be working fine.

Out of curiosity, I asked Bambu Lab Customer Support if I’d get another 30 days from time of receipt of my replacement device to exchange my product if it too was defective, and the response I received was that the replacement device does not come with a new 30-day replacement window.

First of all, I hope that I don’t experience any more issues with my replacement A1 Combo. Second, if I do experience errors related to the hardware, I hope that the customer support agent who replied to my inquiry is incorrect about replacement printers not having a new replacement window. I hope I will never need to find out, but if you have any experiences to share about issues arising from your replacement Bambu Lab devices, please leave a comment. Happy 3D printing everyone!

Friday, October 18, 2024

Bambu Lab A1 Heatbed Temperature Malfunction


I’ve been enjoying my Bambu Lab A1 3D printer. Bambu Lab has done a great job of improving usability of the entire 3D printing process--this includes its MakerWorld model repository, its dedicated Bambu Studio slicer, its calibrated filaments, the Bambu Handy mobile app, and of course the speedy 3D printer itself. Everything just works the way a 3D printer SHOULD work. That is, until it doesn’t.

A couple weeks ago I started to see “Heatbed temperature malfunction” error messages as pictured above. Initially these errors would appear after successful completion of 1 print job and upon the initiation of the next print job without turning the printer off. After pressing the “Confirm” button in Bambu Studio or dismissing the error message on the touchscreen, I would see that the newly initiated print job was suspended in a paused state. After pressing the resume button on the touchscreen, the heatbed would proceed to warm up to the specified temperature (usually 65 Celsius), and a successful print would ensue. I was hoping that this error message was due to a firmware or Bambu Studio software glitch, as I had recently updated both.

However, after several days of encountering intermittent “Heatbed temperature malfunction” error messages in between print jobs, I experienced this error message in the middle of an 8-hour print job, and upon dismissing the error message and resuming the print, the heatbed remained at room temperature. I was concerned about the print falling off the build plate (because warmer temperatures help the printed materials stick to the build plate) but fortunately I had excellent bed adhesion, and to my pleasant surprise, the print successfully completed anyway.

Upon reporting this issue to Bambu Lab Support, I was asked to troubleshoot the heatbed issue by following these instructions on the Bambu Lab Wiki. After purchasing a multimeter and asking ChatGPT how to use one, I was able to confirm that the resistance measurements of the temperature sensor connector and the heatbed power supply connector were both abnormal. According to the wiki, “replacing the heatbed assembly is necessary if both resistance values are abnormal.” So I thought Bambu Lab was going to ship me a new heatbed assembly and I’d have to follow these instructions to replace the heatbed.

Instead, Bambu Lab Support offered to continue troubleshooting the issue by first sending me a new AC board, which contradicts the recommendation from the wiki, or to return and replace the printer because I was (barely) within the 30-day time window after receipt of the 3D printer. Since I am not knowledgeable about electronics, I decided to return and replace the 3D printer and had to follow these instructions to pack my printer. Because I bought the A1 combo which included the AMS Lite unit, I had to return the whole set—this seemed wasteful because the AMS Lite unit was working fine. Anyway, the photos and videos were helpful, but if there was one thing I learned from the experience of packing the printer and accessories, it is that it was extremely important to have saved the original box and all of its packing materials, including the plastic bags and protective foam pads and cardboard inserts.

Bambu Lab provided a UPS shipping label and informed me that “the return process can take around 2-3 weeks, depending on the shipping conditions” and “the replacement will be arranged within 7 business days after the warehouse receives and inspects the package.”

Overall I wish it was a little easier to troubleshoot 3D printer malfunctions, but the Bambu Lab Wiki made the process as simple as it could possibly be. Perhaps a better approach to support average everyday mainstream users would be to have dedicated Bambu Lab service centers, but of course there would have to be a business model to make that happen. Because I purchased my 3D printer from the online store, I had no choice but to work through the online support process. Had I purchased the printer from an authorized reseller, I assume that I could have returned and replaced the printer in the physical store, and I wonder if I could have avoided all the troubleshooting and packing steps. Unfortunately the nearest reseller is about 50 miles away from where I live, but if you live near a reseller and are thinking of buying a Bambu Lab 3D printer, that option may make more sense.

Anyway, I hope my replacement A1 Combo will arrive soon and that there will be no malfunctions with my replacement device.

Sunday, September 15, 2024

Bambu Lab A1 Timelapse Videos

I recorded a timelapse video while printing an object with my Bambu Lab A1. While printing from the micro SD card, I noticed that after selecting my print file, there was a “Timelapse” button on the touch screen that could be toggled on/off prior to starting a print. I turned it on and started the print. A timelapse video was then saved to the micro SD card which I transferred to my computer upon completion.

I learned afterward about the Bambu Studio slicer options for timelapse recordings. You can choose between Traditional model and Smooth mode. Because filament can leak while the print head moves out of the way for the camera to take a snapshot, this can result in imperfections in your print. In Smooth mode, a prime tower is added to your print so that the excess filament can be ejected into the prime tower, resulting in preservation of print quality. So basically you’ll need to choose between compromising print quality or wasting filament in your purge tower. Refer to the Bambu Lab Wiki for more information about Timelapse Functionality.

The timelapse video is in 1536x1080 resolution and is saved to the micro SD card is a .avi file that is encoded with a MJPG codec which is basically a video that is composed of a series of JPG images all compressed into 1 video. The problem I encountered is that many macOS applications cannot decode this format. QuickTime chokes entirely, while VLC displays a “Broken or missing index” error but then eventually allows me to view the video. Final Cut Pro is unable to import the .avi file at all. Fortunately, HandBrake is an open source video transcoder that easily converts the .avi file to .mp4 which is more or less universally compatible with everything nowadays.


Besides the filament leakage issue that I discussed above, another disadvantage of recording timelapse videos is that it adds several seconds of print time to every layer. I won’t be regularly recording timelapse videos of my 3D prints due to the tradeoffs, but it’s great to know that the Bambu Lab A1 has this capability.

Daddy’s New Toy (Bambu Lab A1)

In May 2023, I purchased my first 3D printer, a Creality Ender-3 V2 Neo. For the past 16 months, I have enjoyed learning about 3D printing, model design, model slicing techniques, and getting the end result of having a physical object in my hands. My 3D prints were often for entertainment, although many of them were also gifts or even serving a functional purpose (e.g., repairing and/or upgrading household items). For this, my Ender-3 V2 Neo served me well. On several occasions I’ve had to replace various parts such as 2 hot end fans on separate occasions (which unfortunately required me to disassemble and reassemble all the wires connected to the main circuit board), nozzles, and PTFE tube pneumatic couplers. I also upgraded my heat sink to lessen the chance of filament clogging. Last month I started to experience a higher rate of print failures, particularly on more complex objects. I noticed that my nozzle temperature was no longer holding steady but rather bouncing above and below my set temperature by 1 degree Celsius. To me, that was a harbinger of dreaded additional repairs. Had it not been for the high rate of maintenance work, I probably would have kept my Ender-3 V2 Neo a lot longer.

Earlier this month, I upgraded to a Bambu Lab A1 3D Printer. In addition to much faster print speeds and a larger build plate, the Bambu lab A1 has the ability to print in multiple colors using its AMS or AMS Lite systems. Additionally, the Bambu Lab philosophy seems to be aimed at making 3D printers easier to use and less prone to failure. For example, the A1 is programmed to perform automatic bed leveling, vibration detection, and filament flow calibration by default (most of these can be disabled) prior to each print. The Bambu Studio slicer is similar to Cura and other open source slicers, although there are some nice features that I’ve appreciated seeing in Bambu Studio such as the ability to define filament-specific profiles where nozzle and bed temperatures can be defined for different filaments, rather than defining them per model in Cura. Bambu Studio is also integrated with Maker World which is an online repository of 3D models that also allows users to upload Bambu Studio print profiles—this lets Bambu Lab 3D printer owners to print directly from Maker World to their 3D printer.

I’ve done some test prints just to get familiar with the hardware and software, and I’m impressed so far. In the near future, I will be experimenting with multi-color prints through my AMS Lite system, timelapse videos, and other new features.