Showing posts with label 3D Printing. Show all posts

Monday, June 8, 2026

3D Model License Violation

I contribute 3D models to the 3D printing community on MakerWorld, the Bambu Lab model repository. One of the models that I uploaded was an iPad stand for thick cases, and it is the model in my collection that gets downloaded and printed the most. Recently a stranger messaged me to let me know that Sarina’s 3D Printing was selling my model on Facebook. This was Sarina’s post:

The problem with Sarina’s post is that I had uploaded the iPad stand under a Creative Commons Attribution-NonCommercial 4.0 International Deed (CC BY-NC 4.0) license which means that the model cannot be sold without my permission. So I decided to write a comment on Sarina’s post: “Just so everyone knows, the original model is available at https://makerworld.com/en/models/985191-stand-for-ipad-with-thick-case, and it is provided to the community under an Attribution-NonCommercial license which means that work must be attributed to the original designer, and the object cannot be sold.”

Within a couple of days, the post had been taken down. Unfortunately it is very common for people to violate Creative Commons license terms. Sometimes it is blatant theft, such as these examples:

Because I am only a 3D printing hobbyist, and I don’t depend on 3D printing for income, unapproved use of my models does not impact me financially. If anything, I choose the view the breach of licensing terms of my 3D model as a compliment. However, there are many designers out there whose models are used without their permission.

I greatly appreciate being notified by a stranger that someone was selling my model. I recently noticed some suspicious activity and took similar action. A designer posted AirPods Max Jewelry under a Cults 3D Private Use License which prohibits commercial sale, remixing for public sharing, and distribution. However, the exact same model was reposted as Airpods Max Skeleton Accessory. I publicly commented on the repost and also messaged the original designer.

I’ve found the 3D printing community to be helpful and supportive of one another, although there are occasional bad actors. If we all look out for each other, we can hopefully hold people accountable to the licenses that make this community possible.

Friday, April 17, 2026

3D Printing and Firearm Blocking Technology

On February 17, 2026, California introduced Assembly Bill 2047 which is known as the Firearm Printing Prevention Act. It would require several things to happen:

  • On or before July 1, 2027, the Department of Justice must publish written guidance on performance standards for persons or entities engaged in the creation of firearm blueprint detection algorithm to be certified for use by 3-dimensional printer manufacturers, as specified.
  • On or before January 1, 2028, the Department of Justice must accept applications for certification of firearms blueprint detection algorithms and begin issuing certifications of algorithms that meet or exceed the performance standards.
  • On or before July 1, 2028, any business that produces or manufactures 3-dimensional printers for sale or transfer in California must submit to the Department of Justice an attestation for each make and model of printer they intend to make available for sale or transfer in California, confirming that the manufacturer has equipped that make and model with a certified firearm blueprint detection algorithm.
  • On or before September 1, 2028, the Department of Justice must publish a list of all the makes and models of 3-dimensional printers whose manufacturers have submitted complete self-attestations and would require the department to update the list no less frequently than on a quarterly basis and to make the list available on the department’s internet website.
  • On March 1, 2029, the bill would prohibit the sale or transfer of 3-dimensional printers that are not equipped with firearm blocking technology and that are not listed on the department’s list of manufacturers with a certificate of compliance verification.

The bill would authorize a civil action to be brought against a person who sells, offers to sell, or transfers a printer without the firearm blocking technology. It would also make it a crime to knowingly disable, deactivate, uninstall, or otherwise circumvent any firearm blocking technology.

The bill refers to a couple of terms which deserve exploration. According to Assembly Bill 2047, “firearm blocking technology” means hardware, firmware, or other integrated technological measures capable of ensuring a three-dimensional printer will not proceed to any print job unless the underlying three-dimensional printing file has been evaluated by a firearms blueprints detection algorithm and determined not to be a printing file that would produce a firearm or illegal firearm parts. The bill also states that “firearm blueprint detection algorithm” means a software service that evaluates three-dimensional printing files, whether in the form of stereolithography (STL) files or other computer-aided design files or geometric code, to determine if the files can be used to program a three-dimensional printer to produce a firearm or illegal firearm parts, and flag any such files to prevent their use to manufacture a firearm or illegal firearm parts.

I searched the web to try to find companies or individuals who have created such technologies or algorithms, and the search results mainly yielded articles and videos about the 3D printing legislation in Washington, New York, and California. I then asked ChatGPT to summarize what it knows about firearm detection technology, and it stated that Thingiverse uses AI to detect and remove gun design files, and there are experimental tools such as 3D GUN’T. However, the solutions seem to be immature. ChatGPT concludes that the firearm blueprint detection algorithms mentioned in legislation are “largely hypothetical or early-stage” and “reliable prevention at the printer level is an unsolved problem” which is consistent with my observations.

I think that AI approaches are the best way to address this need, but I can also think of many challenges to doing it accurately. First, 3D models are not always designed so that the finished physical object is contained in a single file—they are often provided in multiple parts. Splitting a model could be necessary because the object is too large to fit on a standard print bed. It could also be because different parts of a model need to be printed with different materials (e.g., to add strength or flexibility) or colors. It could also be that certain features of a model are best printed in a certain orientation to optimize strength, improve print bed adhesion, reduce the need for support material, or factors to minimize chances of print failure. The bottom line is that when models are split into multiple objects, it could become difficult for firearm blocking technology to accurately understand that many parts, when assembled, would resemble a firearm.

Second, firearms come in many shapes and sizes. I suppose that with enough training data, AI-based detection methods could learn what many different kinds of firearms look like. But what happens when users modify (or “remix” as the 3D modeling community would say) models so that they differ from training data? For example, what if a 3D model of a gun is presented in the form of a kit card? Its overall geometry would be a square or rectangle. When the borders and connectors of the kit card are snapped off, it would look like a gun, but that would happen in post-processing (downstream of the AI detection). Or what if a 3D model of a firearm was natively designed with support material? The support material could make the overall geometry significantly different than the firearm after all the support material was removed. Could firearm blocking technology be reliable enough to understand all of this?

Third, will firearm blocking technology be capable of understanding functional capabilities of 3D models? In other words, could it tell the difference between a “real” functional firearm and a non-functional prop? What if someone wants to print a replica of Han Solo’s blaster for a Halloween costume or a Star Wars convention? Would firearm blocking technology have a high enough false positive rate that it could become a burden to print legitimate models that pose no danger to society?

Perhaps there are current solutions to these challenges, or maybe technology will advance rapidly enough in the next couple years that these problems will be in the rear view mirror. In any case, I believe we have a major problem with guns in the United States, and I would love to see progress on reducing injury and death from firearms. However, it feels to me that the 3D printing legislation is misdirected, and I fear that it will adversely affect hobbyists like me while doing little to nothing to curb illegal activity because criminals will just find ways to circumvent firearm blocking technology.

For an additional perspective, read The Dangers of California’s Legislation to Censor 3D Printing by the Electronic Frontier Foundation.

Friday, February 13, 2026

3D Printing Without Wi-Fi

Today I was unable to send a print job wirelessly from my Mac to my Bambu Lab A1 3D printer because our Spectrum internet service went down.

I am accustomed to sending print jobs wirelessly to my 3D printer, in fact I have never done it any other way. Because I can turn my iPhone into a hotspot with my Visible Wireless cellular plan, I connected both my laptop and 3D printer to my hotspot. The connection was slow partly because I have the basic plan with 5 Mbps hotspot speeds but also because my 3D printer is located on the first floor where cellular reception is somewhat spotty. It is good enough for phone calls but not so great when it comes to transmitting larger amounts of data.

I sliced my model in Bambu Studio as I normally do. I then sent the print job which normally occurs in 2 phases. First, Bambu Studio uploads the print job from my laptop to Bambu Lab’s cloud service. Second, it downloads the print job from the Bambu Lab cloud to the 3D printer. It slowly but successfully uploaded the 4.1 MB print job to the cloud. However, the 3D printer struggled for a while to download the print job from the cloud and eventually failed.

Therefore, I reverted to the tried and true local printing method via microSD card which bypasses the internet. After slicing my model in Bambu Studio, instead of sending the print job via the cloud, I chose the “Export plate sliced file” option. From there, a “Save sliced file as:” dialog box allowed me to save a .gcode.3mf file. I placed the .gcode.3mf file in the root directory of the microSD card that came with my Bambu Lab A1 3D printer and powered up the printer. After staring up, I pressed the “Print Files” option on the home screen and selected my .gcode.3mf file. From there, I was able to toggle options for AMS, dynamic flow calibration, and bed leveling, just as I would have done when sending a print job from Bambu Studio via cloud printing. It worked like a charm.

With my first 3D printer, a Creality Ender 3 V2 Neo, I printed exclusively via microSD card because it did not offer a wireless option (at least not natively). Although printing via microSD card is not complex, it certainly is more convenient for me to send print jobs wirelessly than to transfer my microSD card between my computer (2nd floor) and 3D printer (1st floor). Some folks have concerns about privacy when sending print jobs through Bambu Lab cloud services, but I have no such concerns because all my prints are for fun and entertainment, and I have nothing to hide. I like the convenience of cloud printing and will appreciate it even more after my Spectrum internet service is restored!

Wednesday, February 11, 2026

3D Model Figurine Generators

I started 3D printing as a hobby in May 2023. At the time, most of my 3D prints were of models that other people created and uploaded to free online repositories such as the ones I’ve described here. I then took the next logical step of learning a CAD application called Tinkercad to create my own simple models. For some specific use cases, I’ve experimented with 3D modeling streets and terrain. Generative artificial intelligence exploded onto the scene in recent years, and now there are many websites that allow users to upload a photo and automatically generate a 3D figurine without knowing anything about mesh modeling of curved surfaces. In this post, I compare 2 free 3D figurine generators: PrintU by Bambu Lab and FanForge by Creality.

As depicted in the image at the top, I uploaded the same photo to PrintU and FanForge and generated 3D models. Both PrintU and FanForge had relatively easy to understand wizard interfaces, and both websites offered variations for how to generate the 3D models. I generated 3 variations in each application, and screenshots of the 3D models are presented below.

As you can see, the 3 models generated by PrintU were far more realistic than the ones generated by FanForge. In fact, the FanForge models did not even remotely match the facial features that were in the uploaded photo. The FanForge models were more “artistic” which could partially explain their deviation from reality, but if the starting point is a bust photo, I have an expectation that the resultant model should bear some resemblance.

I’d have to experiment with additional models generated by different photos before drawing more definitive conclusions, but my initial impression is that PrintU is the clear winner in this head to head comparison.

Friday, January 30, 2026

3D Printing in the Crosshairs in Washington State

Washington State recently introduced House bills HB 2320 and HB 2321 that aim to restrict the use of 3D printing technology in order to prevent the illegal manufacturing of firearms. While the stated goal of improving public safety is understandable, I feel that these bills are misdirected at the maker community and are a setup for a whole series of unintended consequences. Instead of offering a thoughtful solution, the proposals rely on simplistic and heavy-handed restrictions that may be difficult to implement, costly and impractical to enforce, and largely ineffective at stopping illegal activity.

HB 2320 is entitled “Concerning the regulation of firearm manufacturing” and focuses on expanding regulations around firearm manufacturing, particularly when digital tools like 3D printers, CNC machines, and downloadable design files are used. The bill broadens existing definitions of firearm manufacturing to explicitly include digital methods and makes it illegal to create certain gun parts or firearms without proper licensing. In practice, this would criminalize a wide range of hobbyist activities, even when no harmful intent exists. Many makers use 3D printers for educational projects, prototyping, and mechanical experimentation, and the bill risks sweeping these legitimate uses into a legal gray area. The concern is that well-meaning individuals could face legal consequences simply for owning tools or files that resemble firearm components. Taking a closer look at section 8 on page 31, the proposed new law under HB 2320 would state, among other things:

To my knowledge, there does not exist a 3D printer manufacturer that has the “primary or intended function” of manufacturing firearms. 3D printers can be instructed to make many things, of which firearms are a very small subset. To use an analogy, it would be similar to assuming that car manufacturers make cars that have the primary or intended function of taking you to the gun store, so maybe we should ban cars. This bill represents a gross misunderstanding of 3D printing technology.

HB 2321 is entitled “Requiring three-dimensional printers be equipped with certain blocking technologies” and goes even further by requiring that all 3D printers sold or transferred in Washington be equipped with software that can detect and block the printing of firearm parts as described in section 8 on page 6:

The bill would require manufacturers to implement “firearm blueprint detection algorithms” and prevent printers from producing restricted designs. While this may sound straightforward, the reality is far more complicated. 3D printer files can be easily modified, disguised, or broken into smaller pieces, making detection unreliable. In addition, many 3D printers operate offline or use open-source software, making enforcement nearly impossible, unless all “compliant” 3D printers are forced to use a restricted set of software and firmware which would essentially stifle innovation and progress with 3D printing.

As discussed in this Reddit post from the Seattle community, these rules could also harm small businesses, educators, researchers, and hobbyists who rely on open and flexible printer systems for innovation.

The enforcement challenges of both bills are significant. Policing digital files and machine firmware requires advanced technical oversight that state agencies may not be equipped to handle. Manufacturers would face higher production costs, which would likely be passed on to consumers. Meanwhile, individuals intent on producing illegal firearms could simply bypass these systems by modifying firmware, using older printers, or obtaining equipment from outside the state. This means that law-abiding users would bear the burden of regulation, while bad actors could easily evade it and undermine the effectiveness of the legislation.

Ultimately, these bills reflect a misunderstanding of the 3D printing community and the technology itself. I honestly don’t know how to curb illegal firearm manufacturing or how to address the epidemic of gun violence in the United States, but I highly doubt that HB 2320 and HB 2321 would curb the actions of bad actors or help improve public safety. Instead, they will create unnecessary barriers to innovation and ruin the careers and hobbies of peaceful members of the maker community.

Sunday, December 21, 2025

Bambu Lab Regains My Loyalty

I recently experienced my second Bambu Lab A1 3D printer malfunction in 13 months, and I started to question the durability of Bambu Lab 3D printers. Bambu Lab Support walked me through the troubleshooting process and sent me a free replacement Power Switch Assembly despite my 3D printer being just outside the 1-year warranty window. I received the part yesterday.

Although the replacement part did not come with an instruction booklet, the QR code on the box directed me to the A1 Power Switch Replacement Guide on the Bambu Lab Wiki. I followed the instructions line by line, and although some of the instructions had awkward wording that made it a little confusing to understand at first, the combination of the written instructions along with pictures made things pretty clear. The estimated time to replace the part was 20 minutes. I spent about twice that much time—I am not accustomed to repairing electronics, but I was able to get the job done. Here is the newly installed power switch assembly on the upper right, with the ground cable secured in place on the far left.

Here is where the cables from the power switch thread through a narrow trough to the compartment where the power supply is located. The wiki states, “Note: In the new version of the A1 power switch, we have optimized the cable layout by removing the intermediate ground wire connector to the AC board. Functional and safety tests have verified that this change does not affect the normal operation of the power switch or the overall system, while also reducing the number of connection points and improving the reliability and simplicity of the cable layout.” Hence, the neutral (N) and live (L) wires are connected, but the ground cable of the AC board (PE; protective earth) is intentionally omitted in the replacement power switch assembly.

Finally, I confirmed that there was power going to the 3D printer, as evidenced by the green “OK” indicator on the Bambu Lab Assistant.

After replacing the Power Switch Assembly, I was able to get 6 consecutive 3D prints without power loss. The first 5 prints were small jobs that completed in 20-40 minutes each. The 6th job was a 2.5-hour print, and given these results, I am confident that the printer power loss issue has been fixed.

Although the 3D printer malfunctions are a nuisance, I have to give credit to Bambu Lab for helping me address the problem. First of all, I appreciate the fact that Bambu Lab Support walked me through the appropriate troubleshooting steps. Many companies do not offer detailed troubleshooting and relegate that activity to the third party repair industry or would charge fees to diagnose and repair their products. Second, I appreciate the fact that Bambu Lab Support was able to identify the problem with speed and accuracy. I guess it’s not surprising that Bambu Lab knows their products better than ChatGPT. Third, I appreciate Bambu Lab Support’s flexibility in sending me a replacement part despite my printer falling outside of the 1-year warranty window—I feel that this represents unusually good customer service.

In summary, Bambu Lab lost some of my loyalty to their brand with the 2 malfunctions, but they gained it back with customer support. Thanks Bambu Lab!

Thursday, December 18, 2025

Another Bambu Lab A1 Malfunction

In October 2024, I wrote about my Bambu Lab A1 3D printer heatbed temperature malfunction. Because the malfunction occurred within the 30-day replacement window, I was able to return the printer and have a replacement printer sent to me.

I have had a great experience with my replacement Bambu Lab A1 3D printer until November 2025 when I started witnessing that the printer would randomly lose all power. Sometimes it would happen during the pre-print routines (e.g., bed leveling, bed heating, filament purging), and sometimes it would happen in the middle of a print. Despite the main power switch remaining in the ON position, the printer would lose power, the fans would turn off, the screen would go blank and unresponsive, and the Bambu Studio slicer would lose communication with the printer. Initially this occurred infrequently, but it seemed to occur progressively more frequently over time to the point where most of my prints would fail due to unexpected power loss.

Because of the prior heatbed temperature malfunction in October 2024 and the current power loss malfunction in November 2025, I have started to question the durability of Bambu Lab 3D printers. Nevertheless, I bought another Bambu Lab A1 for three primary reasons. First, I enjoy participating in the Bambub Lab ecosystem where things just work (that is, until my printer breaks down). Second, I have meticulously set up air purifiers both inside and adjacent to my Bambu Lab A1 third party enclosure and didn’t want to re-configure my setup with a different printer’s form factor. I had considered upgrading to the Bambu Lab P2S, but that will have to wait. Third, Bambu Lab was in the midst of their Black Friday sale, and the A1 printer was on sale for $279 (normally $399).

Meanwhile, I asked ChatGPT to help me diagnose the problem, in hopes that maybe I could acquire parts to fix the older printer. After describing my scenario, ChatGPT concluded that there was an 80%+ likelihood that the power supply unit was responsible for the power loss. The other possibilities were a loose power connector (15%), a mainboard power regulator failure (5%), or a firmware or software issue (<1%). It encouraged me to contact Bambu Lab Support and stated that even though my printer was just past the 1-year warranty period, they might still help me out. I had previously written about the Bambu Lab Warranty, and at the time I had focused on the language related to returns, refunds, and replacement within a 30-day window. Looking more closely at the general warranty language dated November 18, 2025, it also says that there is a “2-year warranty for for consumers from the EU, Switzerland, Norway and Iceland” and a “1-year warranty for the rest of the world (any country not mentioned above).”

I submitted a support ticket to Bambu Lab, and they directed me to the Bambu Lab Wiki for “Printer Circuit Failure Troubleshooting - A1”. I confirmed that all indicator lights were in their normal status.

  • The TH Board indicator light was constantly green
  • The MC Board green light blinked every 5 seconds
  • The AP Board had one green light blinking once per second
  • The HMS indicator light was constantly on

Based on questions from Bambu Lab Support, I also confirmed that the fuse was NOT blown, and the power switch had good contacts and no corrosion. Also, I measured the AC power input at terminals #4 (neutral wire) and #5 (live wire) of the power module, and the multimeter reading was 123.8 volts—a normal value in the United States.

Bambu Lab Support asked me if the main power indicator light would turn off when the machine is powered off, and I confirmed that it did. They also asked me to confirm that the 24V power module indicator light was a steady green light (normal state) when the machine is powered on, and I confirmed that it was steady green. They also asked me to verify that connections for terminals #1 through #5 on the power supply were properly inserted, and as far as I could tell, they were. Based on this information, they decided to send me a power switch assembly and noted that despite my printer exceeding the 1-year warranty period, “This component is a special free replacement.”

To me, this gesture from Bambu Lab went a long way toward mitigating my frustration with my 2nd A1 printer malfunction in 13 months. Also, ChatGPT was correct in encouraging me to contact Bambu Lab Support based on a history of them supporting printers past the warranty period. Although I still question the durability of Bambu Lab printers, I must admit that I have received very good support that has exceeded my expectations.

However, one main question remains. Although ChatGPT seemed at least 80% confident that the power supply unit was to blame, Bambu Lab Support sent me a free replacement part for a power switch assembly which ChatGPT suggested was a much less likely culprit. I updated ChatGPT with my recent interactions with Bambu Lab Support and asked if they perhaps wanted to first have me replace the power switch assembly because it was a less expensive part, and ChatGPT agreed with my assessment. It went on to say that it still felt that the power supply was still the most likely culprit and suggested that I replace the power switch assembly as instructed by Bambu Lab Support and see if that fixes my problem. If I still experience power loss after replacing the power switch assembly, then that makes the power supply unit the only remaining rational explanation. ChatGPT communicated to me that this is probably just the normal troubleshooting algorithm they go through. Bambu Lab Support has not commented on their protocol, but the ChatGPT response seems to make logical sense.

So now I anxiously await receipt of my free replacement power switch assembly. I hope it fixes the power loss issue but realistically expect that I may have to reopen the support ticket and ask for further assistance, with possible replacement of the power supply as a result. Stay tuned for what happens next!

Monday, February 17, 2025

Maintaining and Troubleshooting My Bambu Lab A1

I purchased my Bambu Lab A1 Combo about 5 months ago, and with the exception of a heatbed temperature malfunction, I’ve had a great experience with it because the 3D printer just works. In comparison to my older 3D printer, the Bambu Lab printer is relatively worry-free because bed leveling, Z-height adjustments, and flow calibration are done automatically, and success rates with prints are very high. That being said, the printer does require occasional routine maintenance, and there are some common issues that I’ve either experienced myself or see reported by others that may require troubleshooting.

MAINTENANCE

First let’s talk about routine maintenance. I find it helpful that my Bambu Lab A1 reminds me of scheduled maintenance. For example, it tells me when it is time to lubricate the A1 Y-axis guide rail. It displays a QR code on the screen which takes you to the wiki page with written step-by-step instructions and an accompanying video to illustrate.

Another reminder is the availability of firmware upgrades. Upgrading is as simple as accepting the upgrade on the touchscreen or from the Devices tab in Bambu Studio. While most firmware upgrades are welcomed with open arms, there has been recent controversy with the impending release of their Authorization Control System which they state is being done for security reasons. Some users have lamented this forthcoming change, the rumor mill was in full swing, and Bambu Lab issued a statement to set the record straight related to third-party integration with Bambu Connect in an attempt to quell some of the fear. A summary is provided here and here and a zillion other places. Suffice it to say that I am not bothered by it at all, and I will likely just instal the firmware update when it becomes available.

Visit the A1 Maintenance Guidelines for additional recommendations.

TROUBLESHOOTING

Aside from the aforementioned heatbed malfunction, the main issue I’ve had to troubleshoot is related to filament getting stuck in my AMS Lite unit. One time this was due to a tangle in the filament (which was my fault for accidentally letting go of the filament and not checking for tangles when loading the filament), and at other times it had been due to an overly sensitive filament tangle detection feature which simply required me to resume printing (I’ve since deactivated filament tangle detection because of the high rate of false positives).

I’ve recently started following the Bambu Lab subreddit, and there are some common problems that people report. By far the most commonly reported issue is a sloppy or non-adherent first layer, and community contributors are always quick to point out that users have gotten the oils from their fingers onto the build plate. While some people use isopropyl alcohol to clean their build plates, Bambu Lab offers a Textured PEI Plate Cleaning Guide and specifically recommends detergent because alcohol might only spread the oils on the print bed rather than removing it. While some commenters swear by a particular brand of dish detergent, I find that any dish detergent or liquid soap does the job well, as long as I remain vigilant about not touching the build plate with my fingers after washing.

One time I introduced a jam in my hotend because I attempted to feed a new roll of filament into the hotend in the middle of a print job as I reached the end of another roll. I simply needed to understand how to remove the hotend so I could clear the jam, and sure enough there is a wiki on how to replace the A1 toolhead.

Perhaps less common but certainly very dramatic is when users experience hotend clumps. If left unattended for many hours, the clumping can turn into a huge blob. Although it may appear quite disastrous, Bambu Lab provides blob/clump cleaning instructions which should restore printers to fully functional status.

CONCLUSION

As with any hobby, there may be ups and downs. For 3D printing, maintenance and troubleshooting are inevitable, but I think Bambu Lab does a very good job of making it as understandable as possible. I hope your ups far outweigh the downs so that you can unleash your creativity.

Sunday, December 8, 2024

3D Printing and Air Quality, Part 3


I previously discussed 3D printing air quality issues and mitigation approaches here and here. In this post, I’d like to highlight another informative resource—a YouTube video by Jonathan Levi whose screen name is The Next Layer. His video is called “I was DEAD WRONG about air quality” and can be viewed here:


He admits that he is not a scientist, and he also acknowledges that his video is sponsored by a company that makes a featured air circulation unit. That being said, his semi-scientific methods led him to some insightful conclusions. First of all, air filtration is an important approach to improving air quality, but air circulation (room ventilation) are just as important, and a multi-pronged approach may be needed to purify air in 3D printing workspaces. He also noted that despite a combination of filtration and circulation, it often took a long time (e.g., sometimes overnight) to bring air quality back to normal. He also pointed out that outside air can have its own impurities—namely particular matter—depending on where you live. But the impurities of outside air are likely to be particular matter and less likely to be volatile organic compounds, so air circulation would still likely be highly beneficial.

Check out the links in his video description for other informative resources.

Monday, November 25, 2024

3D Printing and Air Quality, Part 2

Image credit: Tom’s 3D Printing Guides and Reviews, https://toms3d.org/

I recently discussed air quality issues related to 3D printing. Shortly after posting my thoughts, I came across an article/blog and accompanying YouTube video by Thomas (“Tom”) Sanladerer that addresses the same key issues that I’m concerned about: what are the health risks related to 3D printing, and what can we do about it? Overall I felt that his work was very interesting and appropriate for the medium in which it was presented: a personal website and social media.

I’ll start with a quick critique. From the perspective of a scientific publication (which I realize is NOT the intent, nor does the author attempt to convey his work as a scientific publication), the main shortcoming of Tom’s work is that it was hard to understand the primary objectives and study methods. Based on “The Question” section, initially it sounded like he was simply trying to quantify emissions across different kinds of filaments which is further corroborated by the “Sensor Build” section. But in the “Test Setup” section he goes on to discuss that his purpose was to “check whether enclosures can help with emissions”. Then in the “Mitigation” section he starts to discuss filtration and extraction systems in addition to enclosures. Therefore, if you’re expecting to read a scientific publication similar to one published in peer-reviewed journals, you’ll find that it may resemble them in some ways, but it’s not organized as such. It may be that with a little bit of work, his study could be repurposed into a manuscript and accepted into a scientific journal.

However, Tom’s work has some advantages over traditional research publications. First, his findings are presented in a very clear manner, both in the paper and the YouTube video. There are lots of photographs and figures that engage the reader to learn more about his efforts to improve air quality related to 3D printing. Second, his work is very informative. For example, he discusses the differences between particulate emissions and volatile organic compounds. He also provides some detail about how he built his own sensors for his investigation. While this kind of information can be found in scientific publications (usually in a Background section), he is able to combine educational content with his intervention because his work is a hybrid between a review article and interventional study. Finally, the main advantage of Tom’s work is his potential reach into the 3D printing community. While most 3D printing enthusiasts will not spend time performing literature reviews in medical bibliographic databases, they are more likely to watch YouTube videos and come across his study (which is admittedly how I learned of his work).

One of the many important lessons we learned from the COVID-19 pandemic is that communication of information often does not originate from the most reputable of sources. The general public is unlikely to look up randomized controlled trials to assess vaccine effectiveness—rather, they listen to people who they know and who they trust, whether it be a celebrity, an athlete, or heaven forbid—a politician. My point is that the level of scientific rigor is far less important here, and I applaud Tom Sanladerer for creating excellent content for the 3D printing community to consider, the key message being that 3D printing may be associated with health risks, and we should be more mindful about how to mitigate those health risks. Until all 3D printer manufacturers build the necessary filtration capabilities into 3D printers, the onus is on the consumer to take safety into their own hands. Safe 3D printing everyone!

Saturday, November 16, 2024

3D Printing and Air Quality


I’ve been a 3D printing hobbyist since May 2023. The ability to download or even make my own models and 3D print them into physical objects has been fascinating to me. I was so enthralled by this technology that I had only more recently started to seriously contemplate the potential health risks related to 3D printing. Unlike certain activities such as driving a car, skiing, and scuba diving where there are obvious risks for adverse health outcomes, the hidden risk of 3D printing is related to long-term exposure of aerosolized plastic byproducts of the 3D printing process.

A review article entitled “Summary and derived Risk Assessment of 3D printing emission studies” provides a summary of 50 studies related to 3D printing emissions and is the most recent comprehensive analysis I’ve seen. The following figure illustrates the particle formation process in which heating of filament results in the release of volatile organic compounds (VOCs), and when the VOCs cool, they form small particles or condensate onto other existing particles.


What can be done to reduce health risks relate to 3D printing emissions? The following figure summarizes methods that have been studied and published and categorizes them into methods that reduce risk of emissions (on the left) and methods that are inconclusive.


The methods that have been demonstrated to reduce risk of emissions include:
  • Lower print temperature
  • PLA instead of ABS
  • Larger room volume
  • Higher air exchange rate
  • Avoiding malfunctions
  • Using a cover
It seems to me that the long-term health risks of 3D printing emissions are still not completely understood. The popularity of consumer 3D printing is rising, especially given the advances by 3D printer manufacturers related to ease of use, so more studies of long-term outcomes related to exposure of 3D printing emissions is warranted. Meanwhile, I think we must assume that we could be doing more to protect ourselves from emissions.

I have had 2 bedslinger 3D printers: a Creality Ender-3 V2 Neo and now a Bambu Lab A1 Combo. Neither one has an enclosure or filtration system to combat filament emissions, and I’ve used both 3D printers in my living room. I’ve always printed with PLA because of its popularity, low cost, and multiple colors available. It is merely by coincidence that it has the lowest emissions of all filament types, but that is certainly a driving force for me to stay with PLA. A few months ago, I placed an air filter next to my 3D printer (as pictured at the top of this post). My air filter has both a HEPA filter that is supposed to trap airborne particles and an activated carbon pre-filter that is supposed to trap VOCs.

As you can see, my setup is suboptimal because of the lack of an enclosure, so despite the presence of the air filter in proximity to the nozzle, it is probably only trapping a fraction of all the emissions, at least initially. Therefore, my general routine when using my 3D printer is to run the air filter on its highest air exchange rate setting while printing, open windows in the living room if outdoor weather permits, and leave the air filter running for a while after the print is completed. I’m open to suggestions related to further reducing exposure to 3D printing emissions.

Wednesday, November 6, 2024

Bambu Lab Warranty


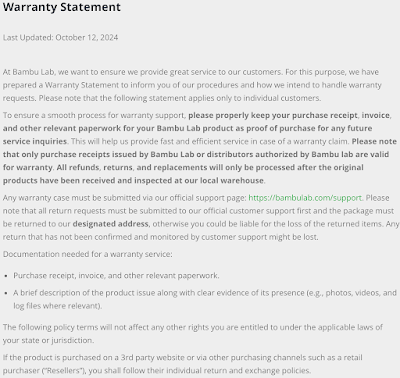
As I mentioned previously, my Bambu Lab A1 experienced a Heatbed Temperature Malfunction which resulted in me getting a replacement A1 Combo. A replacement was offered because my printer was still under warranty, and the warranty is the topic of this blog post. The current Warranty Statement is dated October 12, 2024, and there are general provisions that ask you to keep all of the documentation related to your purchase:

It also says to keep your original packaging box and materials in case you need to return your device:


There is a 14-day Return and Refund Policy which in my opinion is kind of short, but at least there is a policy.

The Replacement Policy is slightly more generous, as you have 30 days:

I was fortunate to have reported my Heatbed Temperature Malfunction to Bambu Lab Customer Support on day 29 after receipt of my A1 Combo, and therefore I was eligible for either replacement or troubleshooting support.

I shipped the defective device to Bambu Lab on 10/15/2024, and I received my replacement A1 Combo 2 weeks later on 10/29/2024. I’ve printed several models with my replacement A1 Combo, and everything seems to be working fine.

Out of curiosity, I asked Bambu Lab Customer Support if I’d get another 30 days from time of receipt of my replacement device to exchange my product if it too was defective, and the response I received was that the replacement device does not come with a new 30-day replacement window.

First of all, I hope that I don’t experience any more issues with my replacement A1 Combo. Second, if I do experience errors related to the hardware, I hope that the customer support agent who replied to my inquiry is incorrect about replacement printers not having a new replacement window. I hope I will never need to find out, but if you have any experiences to share about issues arising from your replacement Bambu Lab devices, please leave a comment. Happy 3D printing everyone!

Friday, October 18, 2024

Bambu Lab A1 Heatbed Temperature Malfunction


I’ve been enjoying my Bambu Lab A1 3D printer. Bambu Lab has done a great job of improving usability of the entire 3D printing process--this includes its MakerWorld model repository, its dedicated Bambu Studio slicer, its calibrated filaments, the Bambu Handy mobile app, and of course the speedy 3D printer itself. Everything just works the way a 3D printer SHOULD work. That is, until it doesn’t.

A couple weeks ago I started to see “Heatbed temperature malfunction” error messages as pictured above. Initially these errors would appear after successful completion of 1 print job and upon the initiation of the next print job without turning the printer off. After pressing the “Confirm” button in Bambu Studio or dismissing the error message on the touchscreen, I would see that the newly initiated print job was suspended in a paused state. After pressing the resume button on the touchscreen, the heatbed would proceed to warm up to the specified temperature (usually 65 Celsius), and a successful print would ensue. I was hoping that this error message was due to a firmware or Bambu Studio software glitch, as I had recently updated both.

However, after several days of encountering intermittent “Heatbed temperature malfunction” error messages in between print jobs, I experienced this error message in the middle of an 8-hour print job, and upon dismissing the error message and resuming the print, the heatbed remained at room temperature. I was concerned about the print falling off the build plate (because warmer temperatures help the printed materials stick to the build plate) but fortunately I had excellent bed adhesion, and to my pleasant surprise, the print successfully completed anyway.

Upon reporting this issue to Bambu Lab Support, I was asked to troubleshoot the heatbed issue by following these instructions on the Bambu Lab Wiki. After purchasing a multimeter and asking ChatGPT how to use one, I was able to confirm that the resistance measurements of the temperature sensor connector and the heatbed power supply connector were both abnormal. According to the wiki, “replacing the heatbed assembly is necessary if both resistance values are abnormal.” So I thought Bambu Lab was going to ship me a new heatbed assembly and I’d have to follow these instructions to replace the heatbed.

Instead, Bambu Lab Support offered to continue troubleshooting the issue by first sending me a new AC board, which contradicts the recommendation from the wiki, or to return and replace the printer because I was (barely) within the 30-day time window after receipt of the 3D printer. Since I am not knowledgeable about electronics, I decided to return and replace the 3D printer and had to follow these instructions to pack my printer. Because I bought the A1 combo which included the AMS Lite unit, I had to return the whole set—this seemed wasteful because the AMS Lite unit was working fine. Anyway, the photos and videos were helpful, but if there was one thing I learned from the experience of packing the printer and accessories, it is that it was extremely important to have saved the original box and all of its packing materials, including the plastic bags and protective foam pads and cardboard inserts.

Bambu Lab provided a UPS shipping label and informed me that “the return process can take around 2-3 weeks, depending on the shipping conditions” and “the replacement will be arranged within 7 business days after the warehouse receives and inspects the package.”

Overall I wish it was a little easier to troubleshoot 3D printer malfunctions, but the Bambu Lab Wiki made the process as simple as it could possibly be. Perhaps a better approach to support average everyday mainstream users would be to have dedicated Bambu Lab service centers, but of course there would have to be a business model to make that happen. Because I purchased my 3D printer from the online store, I had no choice but to work through the online support process. Had I purchased the printer from an authorized reseller, I assume that I could have returned and replaced the printer in the physical store, and I wonder if I could have avoided all the troubleshooting and packing steps. Unfortunately the nearest reseller is about 50 miles away from where I live, but if you live near a reseller and are thinking of buying a Bambu Lab 3D printer, that option may make more sense.

Anyway, I hope my replacement A1 Combo will arrive soon and that there will be no malfunctions with my replacement device.

Sunday, September 15, 2024

Bambu Lab A1 Timelapse Videos

I recorded a timelapse video while printing an object with my Bambu Lab A1. While printing from the micro SD card, I noticed that after selecting my print file, there was a “Timelapse” button on the touch screen that could be toggled on/off prior to starting a print. I turned it on and started the print. A timelapse video was then saved to the micro SD card which I transferred to my computer upon completion.

I learned afterward about the Bambu Studio slicer options for timelapse recordings. You can choose between Traditional model and Smooth mode. Because filament can leak while the print head moves out of the way for the camera to take a snapshot, this can result in imperfections in your print. In Smooth mode, a prime tower is added to your print so that the excess filament can be ejected into the prime tower, resulting in preservation of print quality. So basically you’ll need to choose between compromising print quality or wasting filament in your purge tower. Refer to the Bambu Lab Wiki for more information about Timelapse Functionality.

The timelapse video is in 1536x1080 resolution and is saved to the micro SD card is a .avi file that is encoded with a MJPG codec which is basically a video that is composed of a series of JPG images all compressed into 1 video. The problem I encountered is that many macOS applications cannot decode this format. QuickTime chokes entirely, while VLC displays a “Broken or missing index” error but then eventually allows me to view the video. Final Cut Pro is unable to import the .avi file at all. Fortunately, HandBrake is an open source video transcoder that easily converts the .avi file to .mp4 which is more or less universally compatible with everything nowadays.


Besides the filament leakage issue that I discussed above, another disadvantage of recording timelapse videos is that it adds several seconds of print time to every layer. I won’t be regularly recording timelapse videos of my 3D prints due to the tradeoffs, but it’s great to know that the Bambu Lab A1 has this capability.

Daddy’s New Toy (Bambu Lab A1)

In May 2023, I purchased my first 3D printer, a Creality Ender-3 V2 Neo. For the past 16 months, I have enjoyed learning about 3D printing, model design, model slicing techniques, and getting the end result of having a physical object in my hands. My 3D prints were often for entertainment, although many of them were also gifts or even serving a functional purpose (e.g., repairing and/or upgrading household items). For this, my Ender-3 V2 Neo served me well. On several occasions I’ve had to replace various parts such as 2 hot end fans on separate occasions (which unfortunately required me to disassemble and reassemble all the wires connected to the main circuit board), nozzles, and PTFE tube pneumatic couplers. I also upgraded my heat sink to lessen the chance of filament clogging. Last month I started to experience a higher rate of print failures, particularly on more complex objects. I noticed that my nozzle temperature was no longer holding steady but rather bouncing above and below my set temperature by 1 degree Celsius. To me, that was a harbinger of dreaded additional repairs. Had it not been for the high rate of maintenance work, I probably would have kept my Ender-3 V2 Neo a lot longer.

Earlier this month, I upgraded to a Bambu Lab A1 3D Printer. In addition to much faster print speeds and a larger build plate, the Bambu lab A1 has the ability to print in multiple colors using its AMS or AMS Lite systems. Additionally, the Bambu Lab philosophy seems to be aimed at making 3D printers easier to use and less prone to failure. For example, the A1 is programmed to perform automatic bed leveling, vibration detection, and filament flow calibration by default (most of these can be disabled) prior to each print. The Bambu Studio slicer is similar to Cura and other open source slicers, although there are some nice features that I’ve appreciated seeing in Bambu Studio such as the ability to define filament-specific profiles where nozzle and bed temperatures can be defined for different filaments, rather than defining them per model in Cura. Bambu Studio is also integrated with Maker World which is an online repository of 3D models that also allows users to upload Bambu Studio print profiles—this lets Bambu Lab 3D printer owners to print directly from Maker World to their 3D printer.

I’ve done some test prints just to get familiar with the hardware and software, and I’m impressed so far. In the near future, I will be experimenting with multi-color prints through my AMS Lite system, timelapse videos, and other new features.

Monday, August 26, 2024

Factors Affecting 3D Printed Object Strength

Steven from 3D Printer Academy released a video to his YouTube channel in early 2024 to discuss how wall line counts and infill contribute to the strength of 3D prints. The full video is here:


Bonus: the precursor to this video is here.

Strength tests were performed on 3D printed beams with grid infill and showed some interesting results. All of the following images are screenshots from the video above.

With increasing wall line count…

  • Strength increases linearly
  • Strength to weight ratio increases but with diminishing returns

With increasing infill percentage…

  • Strength increases
  • Strength to weight ratio decreases

The optimal strength/weight ratio is around 20% infill and 3 walls.

Regarding the relative strength/weight ratio of infill types, lightning infill had the highest value, and the author believes that due to the nature of lightning infill, the object is very light, so most of the strength may be coming from the walls. I agree and would also add that because lightning infill is not uniformly distributed throughout the object, the findings related to this infill type should be interpreted in that context. The infill types with the next highest strength/weight ratios were gyroid and 3D honeycomb.

Note that if you use Cura as your slicer, it does not currently come with 3D honeycomb or honeycomb infill. You can get honeycomb infill for Cura, but if you want 3D honeycomb infill, you will need to use another slicer.

Personally I like cubic and gyroid because they are “airtight” in all 3 axes and presumably could withstand forces equally in all directions. Does this information influence how you will slice your next 3D model?

Sunday, July 7, 2024

3D Modeling Earth’s Surface


Have you ever wanted to create a 3D model of a specific section of earth’s surface? I heard that it could be done using topographic data from the U.S. Geological Survey (USGS). So I asked ChatGPT to tell me step by step how to convert USGS topographic data into a 3D model in .stl format (see thread here). In response, ChatGPT told me that I need to:
  1. Download USGS topographic data
  2. Preprocess the data using GDAL to convert to ASCII Grid
  3. Convert ASCII Grid to a 3D mesh using QGIS and the DEMto3D plugin
  4. Optionally refine the 3D model in MeshLab
  5. Save the final model in STL format

That sounded complex to me, as it involves applications and file formats that I have not previously worked with. Fortunately, I discovered that there is a much easier and faster way to get 3D models in .stl format. Simply use a website that provides this specific service. Here are 2 options:

Terrain2STL is a website that allows you to create .stl models of the surface of Earth. Its interface is pretty straightforward. You can zoom/drag to a location using Google Maps which defaults to Terrain View. You can also enter GPS coordinates (refer to this post for a refresher). Next, enter details about the width, height, and other details related to the dimensions of your desired model. Then adjust settings related to water and base height and finally export your model in .stl format. Terrain2STL has the advantage of its simplicity, but its main disadvantage is its resolution which is limited to 90 meters. Here is a screenshot of Terrain2STL (click to enlarge):


TouchTerrain is another website that allows you to create 3D printable terrain models. Similar to Terrain2STL, TouchTerrain allows you to zoom/drag to a location using Google Maps, but TouchTerrain also allows you to search for a place by its name, address, or GPS coordinates which can be very useful. TouchTerrain also allows you to choose from 3 different elevation data sources, each of which has varying resolution ranging from 10 to 2000 meters, depending on its purpose. For me the default USGS data source with 10 meter resolution produced a model with the level of detail that I was looking for. It also has inputs for 3D printer settings such as your build plate dimensions to help you determine the maximum size of your model. After inputting the relevant settings, generate and download your .stl model. Here is a screenshot of TouchTerrain (click to enlarge):


After you get your desired model from either Terrain2STL, TouchTerrain, or another method, you’ll be ready to slice and 3D print your model.

Wednesday, February 21, 2024

Failed 3D Prints

There are many reasons why a 3D print can fail. As a beginner, I’ve made many mistakes while learning to print 3D models. Here are some reasons why my 3D prints have failed.

Bed Leveling. Even though my 3D printer has an automatic bed leveling feature, sometimes I get lazy and make many successive prints without leveling the bed. I hear from many experienced people that it is not necessary to level your print bed before every single print, but eventually it may be necessary to level the bed. I haven’t heard of a magic formula to determine when you should level your bed, but I’ve experienced print failures due to not leveling the bed after a long print job (e.g., 48 hours).

Z Offset. Sometimes after bed leveling, I don’t correctly adjust the Z-axis offset. This is often due to my laziness when performing the “paper test” where you want a piece of paper to be gently grazed between the nozzle and print bed. You see, I usually don’t bother removing all the filament from the nozzle before the paper test, so this results in me setting the Z offset too high which results in insufficient bed adhesion. The photo above illustrates that a pile of spaghetti can be the result of setting the Z offset too high.

Nozzle Temperature. When I first started 3D printing, I heard that 200 degrees C was a good starting point for printing PLA filament, and I had success with many prints at that temperature. However, it later occurred to me that depending on the filament that you purchase, there may be different recommended temperature ranges. Many of my print failures have been due to setting my nozzle temperature too low. Nowadays I default to a nozzle temperature of 205 degrees C, but I pay more attention to the recommended temperatures of different filaments and may adjust the slicer settings accordingly.

Heat Break. My prior 3 examples have all been related to settings that can be configured on the 3D printer or slicer software. This last example is related to a piece of hardware, the heat break. The heat break is designed to pass heat from the heater block (which heats up the nozzle) to the heat sink. You see, the filament is supposed to melt only in the nozzle and not anywhere upstream of it. The filament tube is meant to channel the filament to the heat break and should never melt. My Creality Ender-3 V2 Neo comes with a standard heat break which in some circumstances can result in a jam due to melting of the filament tube or filament melting too far upstream of the nozzle. My fix to this problem was to upgrade my heat break with a design that puts a little more distance between my filament tubing and the nozzle. Check out this video for more information:


I hope this has been helpful. Can you think of other reasons why a beginner might not get successful prints?