Saturday, December 30, 2023

Charging a Canon EOS R6 Battery via USB

I recently bought a Canon EOS R6 mirrorless camera and Canon RF 24-240mm F4-6.3 IS USM lens. For a family vacation, I made sure to purchase an extra LP-E6NH battery pack. However, I forgot to bring my battery charger. DOH! Fortunately I discovered that you can use a USB power adapter to charge a battery using the EOS R6 camera body. The instructions are provided here.

The digital terminal on the R6 body contains a USB-C port, and I initially tried to charge the battery using a USB-C cable with an Apple 5W wall adapter. However, the green indicator would not turn on (i.e., charging had not begun). I then tried an Apple 87W USB-C power adapter with the same USB-C cable, and charging began. It appears that there is a minimum power requirement, but the Canon EOS R6 manual does not seem to state what it is. If you know of another reliable source of this information, or if you have personal experience with various power supplies, please leave a comment below.

Since I needed to go to sleep and did not want to leave the charging cable plugged in overnight, I unplugged the USB-C charging cable after about 2 hours and 45 minutes, despite the continued presence of the green indicator light. The battery capacity was listed at 93%. Therefore, I estimate that about 3 hours is needed to charge a battery from 0% to 100% with my configuration.

Tuesday, December 26, 2023

On the Recovery of a Phone

My daughter recently lost her phone at Six Flags Magic Mountain. We submitted a Lost and Found Report, and we were informed the next day that the phone had been found. We were given the option to have the phone shipped to us via FedEx for about $33 or to have it held for pickup within the next 30 days. We went to Magic Mountain again today and retrieved the phone from Guest Relations. To no surprise, the screen was cracked.


We had estimated that the phone was lost at around 4:15 PM, and according to the FindMy app, its last broadcasted location was 4:36 PM that same day. Therefore, I was hopeful that the phone would still be in working order and that we could simply replace the screen. However, after connecting a charging cable to the phone and attempting to power it on, it only provided a faint diffuse white glow instead of the familiar Apple logo, and it would not boot. Furthermore, after a couple more minutes of charging, the phone became hot, so we figured the phone was likely beyond recovery if not dangerous to operate.

As a side note, my daughter had stuffed a couple of miscellaneous items into her phone case, as well as a $20 bill. Everything remained in the phone case, minus the $20 bill. I reported the loss of the money to a manager at Guest Relations. I suggested some possible ways to increase accountability and reduce the likelihood of theft, and she kindly listened to my suggestions.

I guess my daughter will receive another Christmas present this year.

Friday, December 22, 2023

On the Loss of a Phone

I took my daughter to Six Flags Magic Mountain today. We’ve had season passes for many years, and today was the last day that we were planning to visit for 2023. On the Twisted Colossus Ride (which includes a couple of sections where riders are upside down), her phone slipped out of her back pocket and was nowhere to be found. We were directed to Guest Relations where we were told to file a Lost & Found Report:


As described in the instructions, we were told that it is important to provide the IMEI number. I know how to retrieve the IMEI number from the settings on an iPhone, but since the phone was lost, we don’t have it. We were told to retrieve it from our carrier.

Our carrier is Visible, a low-cost plan by Verizon. Part of what enables Visible to be low-cost is that there is no option to speak to a live customer support representative—instead, all inquiries must be done via chat. To chat with a representative, you must login to your account. Well, I had not logged in to the account in quite some time, and after entering the username and password, Visible insisted that I turn on 2-factor authentication and gave me only 1 option to enable it: by sending a text message to the phone which we did not have in our possession.

As a workaround, I decided to try the Messages app on my daughter’s Mac, where she can normally send and receive text messages. I found, however, that while I was able to send and receive iMessages to her account via WiFi (which show up in blue), we could not receive the SMS text messages (which show up in green) from Visible without her phone so were unable to turn on 2-factor authentication. And therefore it seemed too difficult at the moment to contact Visible to retrieve the IMEI number.

I noticed in the Lost & Found Report form, there was a “How to find an IMEI number” tooltip which provided many options to try if you have the phone. These were nice to know but useless to me in this situation:

  • Dial *#06# on device
  • Navigate to Settings > General > About
  • Look on the back of the device
  • Look on the back of the SIM card tray

It also said that if you’ve lost the device, check the IMEI number on the product packaging. Unfortunately we bought the phone used, and Visible did not provide us with the original product packaging.

Finally, it provided an option to visit appleid.apple.com > Devices. When I logged in with my daughter’s Apple ID, my heart sank when the 2-factor authentication message said that it needed to send a text message to her phone WHICH WE DID NOT HAVE IN OUR POSSESSION. I clicked OK anyway, and thank goodness that all Apple devices that are logged in with the Apple ID are prompted to allow or disallow the login. So from her Mac, we clicked “Allow” which provided us with the 6-digit number for 2-factor authentication. From the Devices section, we were able to see the serial number and IMEI number of the phone.

Finally we were able to submit the Lost & Found Report to Magic Mountain. We received a confirmation of receipt of the report, and now we wait and see if they find it. While at Guest Relations, we were told that there is a 50% success rate for finding lost items. Fingers crossed. The moral of the story is:

LOSING A PHONE SUCKS

Social Media Friend Requests

If you spend time on social media accounts, you’ve probably received friend requests from people you don’t know. In my experience, there is a good chance that many of those friend requests are not from your real friends. For example, the screenshot above shows only a partial list of my most recent friend requests. I don’t know any of those “people” and have only 1 mutual friend with one of them. My guess is that they are all AI-generated profiles from people who are trying to build up their networks and then sell them to people who will then use those profiles for advertising, information gathering, or other purposes.

This website talks about more reasons the kinds of people who might want to send fake friend requests: scammers, malicious linkers, catfishers, exes, significant others, or even private investigators. It also describes ways that you can identify fake friend requests: common connections, “attractive” photo, limited history, friend composition, and timeline content. The friend requests in the screenshot all happen to be Asian females, and they all seem to be airbrushed or AI-generated which to me were dead giveaways, and the lack of common connections further reinforces their lack of authenticity.

Professional networking sites like LinkedIn are also inundated with fake profiles as discussed here. While I don’t accept friend requests on social media accounts, my policy on LinkedIn had been to accept known connections as well as people in my industry who might be good professional connections to have. I’ve personally accepted at least 1 fake profile which I detected because that person posted a somewhat strange comment on a thread which sounded to me like it was AI-generated. I then realized that their profile made no sense, and furthermore I noticed that the work experience and education changed from day to day. LinkedIn and other networking sites have mechanisms to allow you to report fake accounts, so consider using them.

Fake accounts are a growing problem, and I hope this helps raise awareness and prevents you from falling victim to this practice.

Wednesday, December 20, 2023

Lee Family 2023 Year In Review


I asked ChatGPT to introduce our annual newsletter and extend holiday greetings. This was its response, with only a single edit where I inserted the hyperlink.

“As we gather around the warmth of the holiday season, it is with great joy and gratitude that we present our annual Lee Family 2023 Year in Review newsletter. This past year has been a tapestry woven with moments of laughter, growth, and love. From milestones and adventures to everyday triumphs, we are excited to share the chapters that have defined our lives in 2023. As we reflect on the memories we've created together, we are reminded of the importance of cherished moments spent with loved ones. Wishing you all a holiday season filled with warmth, togetherness, and the magic of creating memories that will last a lifetime.”

Prior editions of our newsletters are hosted on Dropbox. Depending on the device you are using, you might be prompted by Dropbox to sign in, download the mobile app, or continue to the website—you can simply select the option to continue or dismiss the dialog box.

Our home movies are available on Victor’s YouTube channel.

Tuesday, December 19, 2023

Digital Camera Shutter Counts

I recently upgraded my digital camera from a Canon EOS Rebel T4i to a refurbished Canon EOS R6. Despite the camera looking brand new (i.e., no visible signs of wear and tear on the exterior), naturally I wanted to see if I could retrieve its shutter count. The shutter count (a.k.a. shutter actuation number) is the number of times a camera’s mechanical shutter has been fired and is an indicator of wear and tear, similar to the mileage on a used car. But unlike a used car where you can simply look at the odometer to see the mileage, getting the shutter count from a camera can be tricky.

From what I’ve read in multiple discussion forums, and based on my own experience, there does not exist a universally compatible method of obtaining shutter count for all camera makes and models. If you’re trying to obtain a shutter count on your digital camera, you might need to tinker with different approaches until you find one that works.

Approach 1: Get Shutter Count From Camera Body

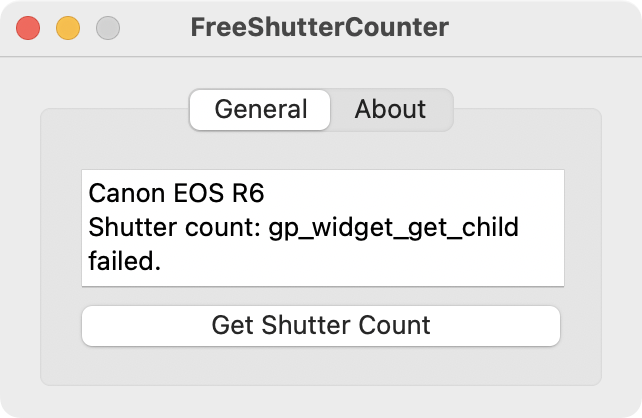
The first approach is to try a dedicated software application that can fetch the shutter count from your camera body. This is typically done by connecting the camera body to your computer via a USB cable. Software applications may differ on Windows and Mac operating systems, but I found that Mac freeware application FreeShutterCounter v1.2.2 was able to retrieve the shutter count on my T4i which was listed as a supported camera.

Unfortunately it was unable to retrieve the shutter count on my R6. That was not surprising because the R6 was not listed as a supported camera.

There is also a ShutterCount app which is available for purchase (currently $8.99) on the Mac App Store. Instead of providing an exact shutter count for the R6, it provides a shutter count of “≤ 1000” and addresses this in its FAQ as follows:

“New Canon cameras (all mirrorless models as well as DSLRs released in the recent years) provide the shutter counter value in 1000 increments. This is how 1D-series models always displayed the counter in the menu. Obviously Canon is on the opinion that this is pretty much enough for practical purposes. So ShutterCount follows what Canon dictates, and displays the counter identical to how 1D-series models and the R3 does it: in "less than or equal to" notation, and in 1000 increments.”

Approach 2: Get Shutter Count From Image EXIF Metadata

The second approach is to try to retrieve the exchangeable image file format (EXIF) metadata from an image file. EXIF data typically store things like the image date/time, camera body, camera lens, image filename, shutter speed, aperture, and other camera settings that were used to take the image. It may or may not include the shutter count. If it does contain the shutter count, the metadata field may be called “shutter count” or “image number” or other variations depending on the make and model of your camera.

I used ExifTool which a free command line executable and a collection of libraries. It does not come with a graphical user interface, so if you’re not accustomed to entering commands in a terminal application, you may struggle to use it. In any case, I retrieved EXIF metadata from images in both of my cameras, and it appears that shutter count is not stored in images in my older T4i, but it does exist in the images for my newer R6.

(blah blah blah)
Specular White Level            : 14888
Linearity Upper Margin          : 12735
Shutter Count                   : 16
Vignetting Corr Version         : 96
Rating                          : 0
(yada yada yada)

This was the data read from IMG_0009.CR3, the 9th photo I had ever taken from my refurbished R6, so I assume that the shutter count was 7 upon arrival.

Coincidentally I later found a Mac app called ExifTool Reader which is available for free on the Mac App Store. It appears that this is simply a macOS application that uses the ExifTool libraries. I tried unsuccessfully to obtain the shutter count on my R6, and while troubleshooting, I discovered that ExifTool Reader (the app) is currently using version 12.59 of the ExifTool libraries (updated 4/2/2023), whereas ExifTool (the command line executable and libraries) is currently on version 12.70 (updated 11/19/2023). I assume that somewhere between version 12.59 and 12.70, the libraries began to recognize the shutter count in my R6 EXIF metadata.

A variation of this approach is to upload an image file to a shutter count website. There are many such websites, and you should pay attention to any fine print regarding what they may do with the images that you upload. Consider taking a dummy photo and submitting that. I tried a few of these websites, and all of them informed me that my uploaded image from my R6 does not store shutter count information, despite me having successfully retrieved the shutter count using ExifTool. One of the websites cleverly offered a “helpful” link to a software application that claimed to be able to retrieve my camera’s shutter count. I am purposefully not adding links to any of these websites because I am unable to verify authenticity and was not able to get any of them to work.

I wonder if certain websites are unable to retrieve shutter count from the EXIF data due to evolving specifications. EXIF 1.0 was published in October 1995, EXIF 2.0 was published in November 1997, and EXIF 3.0 was published in May 2023. It is possible that firmware updates may result in differences in how EXIF data are written into image files, thus making it difficult for websites and app developers to stay current.

In summary, if you are not aware of a verified method of obtaining the shutter count from your camera, you may need to experiment until you find one that works. And if you own a Canon EOS R6, hopefully an EXIF reader will get you straight to the answer.

Saturday, October 7, 2023

3D Printer Tubing - Pneumatic Couplers


I am learning about 3D printer parts the hard way. A couple days ago, I was printing an object that required the Bowden extruder on my Creality Ender-3 V2 Neo to repeatedly extrude and retract the filament. This resulted in grinding and stripping my filament and ultimately a failed print. Failed prints will happen from time to time, so that wasn’t a big deal. However, as I tried to remove the filament from the extruder, the filament broke, and the only way I could remove the filament was to disassemble the tubing that connected the Bowden extruder to the nozzle (a.k.a. “hot end”). It was the first time I had to remove the tubing, and I was able to extract the filament. The following video may be helpful if you are not familiar with the process:

Mission accomplished, right? Wrong. While removing the tubing, I slid the pneumatic quick coupler (specifically, a PC4-M10 fitting) downstream (i.e., away from the extruder and toward the nozzle). To replace the tubing, I tried to slide the coupler back to its original position, but it would not budge. Since the tubing was smooth and slippery, I used all sorts of techniques to get a better grip on the tubing, but to no avail. Since I was unfamiliar with this particular kind of coupler, I did not know that it was self-locking in the upstream direction. After researching 3D printer parts, I finally inferred (but didn’t read anything that explicitly stated) that I had to press the quick release to allow the coupler to slide smoothly in both directions along the tubing.

I’ve written previously about how 3D printing is becoming more mainstream (here and here) because of improved functionality and more affordable prices, but I think users still need to be slightly tech-savvy and have a little bit of aptitude for building/making things. So in hopes of helping other novices like me, I’d just like to say that if you ever need to disconnect the tubing, you should familiarize yourself with how your coupler works!

Thursday, August 17, 2023

Sanlaki VR Table Tennis Adapter

In a recent post about Eleven Table Tennis Adapters, I mentioned that you can obtain 3D models of Quest table tennis adapters on Thingiverse. I recently printed a Quest 2 Sanlaki adapter and configured my Eleven Table Tennis game with the Sanlaki F3 adapter profile.

My first impression is that it is my favorite Quest 2 table tennis adapter so far. Unlike the AMVR and Solidslime adapters that have caused me to play worse, My immediate reaction to the Sanlaki adapter is that I feel like I can play about as well as I was able to play with the Quest 2 controller alone. So in other words, no negative impact on my game. The Sanlaki adapter does feel ever so slightly more top-heavy than the Solidslime adapter but not as top-heavy as the AMVR. Time will tell if my forearm will get fatigued after longer playing periods, but things look good so far.

Also, it is amazing to me that Sanlaki would upload the 3D model for their adapter for people to print their own copies when the adapter is also sold for $24.99 + shipping. Initially I wondered if a clever designer had illegitimately reverse-engineered the Sanlaki adapter and passed it off as if it was the real thing. The 3D model on Thingiverse was posted by Lerrick Salas, and as you can see on the About Us section of the Sanlaki website, the company is run by Lerrick Salas and his business partner Cristina Chrisel. So from what I can tell, everything appears to be legit, and you can see more of Lerrick’s designs here.

Big kudos to Sanlaki for making a great product and also for sharing many of its 3D models. If you are in the market for a Quest table tennis adapter and don’t have a 3D printer, consider buying the Sanlaki VR Table Tennis Paddle Adapter.

Tuesday, August 15, 2023

A New 3D Printer For Less Than $200

Yesterday I published a 3D Printer Buyer’s Guide that was targeted to first-time buyers. In short, I recommended the Creality Ender-3 V2 Neo. At approximately $250, it’s a great all-around 3D printer for beginners. This morning I received an announcement from Creality that they have released the Ender-3 V3 SE. More details are provided on this blog and product page. I knew that yesterday’s post would eventually become outdated, but not having actually used the Ender-3 V3 SE, I’d say that this would be an equally good if not better starting point for a first-time buyer.

The Ender-3 V3 SE is more or less the same as the Ender-3 V2 Neo, with a few differences. First, they’ve appeared to improve the display with a better user interface. Second, there is new automatic filament loading and unloading feature. Third, the flexible build plate is no longer provided with the Ender-3 V3 SE, but it can be purchased as an optional accessory. Finally, and perhaps the most compelling and welcome change for many buyers, the Ender-3 V3 SE is priced at $199 as of today. I believe that there is a competitive advantage to breaking the $200 barrier because psychologically it may be perceived to be within reach by many people who might have been sitting the fence. Of course when you add tax, filament, a flexible build plate, and other accessories, it will be more than $200. However, in my opinion the additional ease-of-use features and the competitive pricing are critically important in bringing 3D printers into more households and making this hobby more mainstream. Everybody wins!

Monday, August 14, 2023

3D Printing Tips for Beginners

As I mentioned in a previous post, I’m a 3D printing newbie. It’s been a steep but fun learning curve, and I thought I’d share a few lessons learned so that other beginners can learn best practices and/or avoid mistakes that I’ve made.

Choose a Slicer. First some background… A 3D printer extrudes filament onto the print bed, and you can think of that as “the last mile” of 3D printing. Before the actual print job can begin, you need a slicer application that provides instructions to your 3D printer (via a G-Code file) that tells it precisely how to lay down the filament step by step to print your 3D object. The slicer needs to be configured to understand what 3D printer you’re using because 3D printers vary in their physical dimensions, number of extruders, and other parameters that affect the physical limits of what can be printed. After loading a 3D model into the slicer, a user must also specify nozzle temperature (which may need to be adjusted based on the material that is used for the print), bed temperature (to ensure proper adhesion), print quality (layer height), wall thickness, infill density, supports, and many other parameters that may need to be customized to the object that is being printed. Getting the settings wrong in the slicer may lead to a 3D print yielding a pile of spaghetti.

I have a Creality Ender-3 V2 Neo, and Creality provides free slicing software. While it may be advantageous to use the slicer that is provided by your 3D printer manufacturer (e.g., ensured compatibility with your 3D printer), there is also potential benefit to choosing a slicer that has wide community adoption and strong developer support so you get more frequent bug fixes and new features. For this reason, I chose Ultimaker Cura which is a free open-source slicer. Of course, there is no reason why you can’t use more than 1 slicer, but I find it easier as a beginner to learn the nuances of just 1 slicer application. A more in-depth comparison of Creality slicers vs. Cura is provided here. I’ve also heard good things about PrusaSlicer but have not used it. A more comprehensive comparison of slicer applications is available here.

Calibrate Z-Offset. In addition to getting all of your slicer settings correctly configured, you must also set the Z-axis offset (or just “Z-offset” for short) which determines the height (i.e., position of the nozzle on the vertical or Z axis) of the first layer of your print. If the Z-offset is too low, you could squish the bottom layers of your object and even damage your print bed. If the Z-offset is too high, you may get poor adhesion and a failed print job. Unfortunately I’ve committed both errors, so I understand the importance of getting the Z-offset setting just right. This article explains different ways to set the Z-offset, but you should also check with your 3D printer manufacturer for additional best practices on how to optimize that setting.

Remove Filament Tangles. Most filament-based 3D printers have an extruder that pushes and pulls filament through a hot nozzle where the filament is laid down to create your 3D object. Filament is typically packaged in spools where you thread the free end into the extruder of your 3D printer. Before you thread the filament into the extruder, it is a good idea to make sure that you’ve checked for tangles. If your filament happens to wrap over itself, the resultant tangle may require additional force to pull the filament from its spool, and that can result in under-extrusion or a complete stoppage of filament extrusion depending on the degree of entanglement. Obviously this can result in failed print jobs which is frustrating because your only recourse is to start over. Unfortunately this happened to me twice before I figured out why my print job kept failing.

If you are a beginner, I hope you learned a thing or two from this post. Also check out Failed 3D Prints, and How to Fix Them and 3D Printing Troubleshooting: All Problems & Solutions for more practical advice as well as 17 Epic 3D Printing Fails & Why They Failed for a more humorous (or not so humorous, depending on your point of view) look at epic 3D printing catastrophes that will likely make you feel better about your own 3D print failures.

Buyer’s Guide - 3D Printers for Beginners


TL;DR: If you’re a first-time buyer of a 3D printer, consider the Creality Ender-3 V2 Neo. If you want to evaluate other options, read on.

I recently purchased my first 3D printer, a Creality Ender-3 V2 Neo. I chose this 3D printer because it has received very favorable reviews and was reasonably priced ($300 when I bought it in May 2023 and currently on sale for $250). There are many features of this particular model that I find to be useful, and although this is not a comprehensive buyer’s guide, my intent is to give you a few things to think about when buying your first 3D printer. I am not an expert, so my viewpoints are mostly from the perspective of the owner of an Ender-3 V2 Neo.

Assembly. I read that some older Creality Ender-3 models required several hours of assembly time, and perhaps that may be true of some other models made by other manufacturers. The Ender-3 V2 Neo was advertised as “95% Pre-Installed” which was appealing to me since I wanted to minimize setup time and get straight to 3D printing. I spent about 45 minutes unboxing the printer and getting it fully assembled, despite being completely unfamiliar with 3D printer parts and terminology. One of the challenges with assembly of the Ender-3 V2 Neo was that although there was a paper instruction manual, the booklet and print size were so small that it was very difficult to read. Fortunately several people had commented on online forums that a PDF version of the manuals was also available online (a PDF version of the manuals also came with the micro SD card and USB to microSD adapter that accompanied the 3D printer), so it was possible to enlarge the instructions and diagrams on a computer monitor. You might want to check online forums for helpful assembly tips for your 3D printer.

Auto Bed Leveling. Prior to my purchase, I was aware of the importance of having a level print bed to ensure good adhesion of your print to the bed surface. I had even watched video tutorials of how to manually level the print bed, and it seemed like a lot of steps to me. Therefore, it was a huge selling point to have an automatic bed leveling feature in the Ender-3 V2 Neo. Before your first print, you may still need to adjust the knobs and springs below the corners of your print bed if macro adjustments are needed, but I was blissfully ignorant of that and went straight to auto bed leveling and haven’t experienced any issues. Auto bed leveling eliminates a lot of the hassle out of preparing for your print job.

Flexible Print Bed. Many 3D printers come with print beds made of varying kinds of glass, steel, or other materials. The Ender-3 V2 Neo comes with a powder-coated flexible magnetic spring steel build plate which offers good adhesion and makes it easy to remove prints from the bed surface. In my experience, simply removing the magnetic build plate from the printer and bending it a few times results in the print job easily popping off the plate. I find that skirts printed around the object are harder to remove but can be easily scraped off with a spatula as long as settings are configured properly. The only downside I’ve experienced from the flexible print bed is that on a couple of occasions I’ve set the Z offset (height of the first print layer) too low, and that resulted in my print job and skirt being difficult to remove (hint: isopropyl alcohol came in handy) as well as the filament leaving a permanent mark on the print bed. I’m not sure if something similar would have happened on glass or metal, but I suspect that it might be easier to damage a flexible print bed. That being said, a replacement flexible print bed is pretty inexpensive, and I really like this option.

Beyond these 3 factors, there were other considerations that did not weigh as heavily into my selection of a 3D printer, but you might want to compare these features across 3D printers anyway. For example, the composition of the extruder may make a difference. The Ender-3 V2 Neo features a full metal extruder which was an upgrade from the Ender-3 V2 which is made of plastic and more prone to breaking. What does the user interface look like? Is your printer make and model common enough so that there are default settings available in most slicer applications? What print dimensions do you require, and is it worth it to spend more on a larger printer? Finally, what is your total budget? Keep in mind that you will likely also spend money on buying filament and possibly other accessories (note that the Ender-3 V2 Neo came with extra print nozzles, spatula, filament cutting pliers, and other goodies).

All in all, I found the Creality Ender-3 V2 Neo to be a great balance between features and cost. If you’ve been thinking about tinkering with 3D printing, now is a great time to pick up a new hobby because prices have dropped to the point where 3D printing can become more mainstream. Regardless of the 3D printer that you buy, be patient and have fun!

Monday, August 7, 2023

Eleven Table Tennis Adapters

I’ve been playing Eleven Table Tennis (ETT) on the Meta Quest 2 for more than a year. I’ve previously written about ETT personality profiles, how the game addresses latency to produce near-real time gameplay and how to revert to an older version of ETT.

Although the Quest 2 adapters work quite well for me, many players have recommended that I use a table tennis adapter to more realistically simulate the holding of a real table tennis paddle. There are many adapters to choose from, and the first consideration seems to be whether you want to use a traditional shakehand grip (which looks roughly similar to how you might shake someone’s hand) or penhold grip (which is popular among Chinese players). I prefer the penhold grip and will share my experience with 2 different adapters.

The first adapter I bought was the AMVR adapter which has received good reviews. The Quest controller mounts securely, and I never worried about the controller flying off the adapter. There is an AMVR adapter setting that comes standard with ETT, so configuration is easy. However, after playing for a while, I felt that my forearm was getting sore due to the setup being top-heavy. After a week or so, I decided to return the AMVR adapter and try something different.

Many players have recommended the SolidSlime adapter, so I decided to give it a try. The Quest controller is mounted closer to the handle, so the weight distribution feels more natural than the AMVR adapter. For me, this is the major improvement over the AMVR adapter. The SolidSlime adapter comes with a couple of thumbscrews that are used to clamp the Quest controller in place. Despite fully tightening the screws, I still get a small amount of movement/shake in my controller, although I can’t say that it noticeably affects gameplay. There is also an in-game setting for this adapter, so configuration is quick and simple. This is the adapter that I plan to stick with for the time being.

I must admit that with both the AMVR and SolidSlime adapters, I have not played as well as compared with the Quest controllers alone. However, I have played with the Quest controller far longer than I have played with an adapter, so I plan to give it some more time and see if my game improves.

Finally, it appears to me that the SolidSlime adapter is 3D printed. If you have a 3D printer and want to experiment with some different adapters, you can find several Quest table tennis adapters on Thingiverse.


Sunday, July 23, 2023

Online Tracking Technologies

In a previous “Hospital Websites and Meta Pixel” post, I discussed how the Meta Pixel tracker was found on many hospital websites, including appointment scheduling pages and password-protected patient portals. This could result in Meta (the parent company of Facebook) obtaining protected health information (PHI) which would violate the law, namely the Health Insurance Portability and Accountability Act of 1996 (HIPAA).

A few days ago, the Office for Civil Rights (OCR, a federal agency under the U.S. Department of Health and Human Services) and the Federal Trade Commission (FTC) issued a press release to warn hospital systems that “the use of online tracking technologies that may be integrated into their websites or mobile apps that may be impermissibly disclosing consumers’ sensitive personal health data to third parties.”

It also links to a joint letter that was sent to approximately 130 hospital systems and telehealth providers whose intent was to emphasize potential risks around the use of online tracking technologies. The letter specifically names Meta/Facebook Pixel and Google Analytics as examples of online trackers that can “gather identifiable information about users as they interact with a website or mobile app, often in ways which are not avoidable by and largely unknown to users.”

Although no enforcement activity was mentioned, it concluded by recommending the following: “To the extent you are using the tracking technologies described in this letter on your website or app, we strongly encourage you to review the laws cited in this letter and take actions to protect the privacy and security of individuals’ health information.”

In December 2022, the OCR had issued guidance for the use of online tracking technologies and specifically mentioned that “Regulated entities are not permitted to use tracking technologies in a manner that would result in impermissible disclosures of PHI to tracking technology vendors or any other violations of the HIPAA Rules.”

It is clear that healthcare provider organizations have been put on notice about patient privacy and security requirements under HIPAA law. It will be interesting to see if there are any officially documented violations that result in enforcement action.

Monday, June 19, 2023

UPS Fail, Amazon Win

I recently purchased an item at Amazon and decided to return it. Like many other times in the past, I simply indicated that I wanted to return the item and then was sent a QR code which I took to a nearby UPS Store, along with the item. I suspected that something was wrong because unlike previous experiences with returns where I received a refund within hours or days, I had received no communication from Amazon after several days. I was able to obtain the UPS tracking number for my return and discovered that the package had not made it to its destination.

About 1.5 weeks after returning the item, I attempted to inquire about the delay through UPS, but after fumbling through its website and automated phone triaging system, I was unable to resolve my issue or find a way to speak to a human. The only remaining potentially viable option at UPS was to file a claim, but I was unable to find any criteria related to whether this was the proper approach for my situation. Also, given that the item needed to be received by the Amazon seller by a particular date to qualify for a return, I did not want to get lost in limbo with a UPS claim if it were to be unresolved by the return deadline.

Therefore, I decided to contact Amazon. Initially I struggled to find a way to speak to a live Amazon customer service agent. Like many other large companies, the Amazon website is designed to attempt to resolve a vast majority of customer inquiries. However, none of the standard automated options met my needs. Unable to find a way to speak to a live Amazon agent, I asked Google and was directed to this link which allows customers to request that a representative call them back:

https://www.amazon.com/go/contact-us/call

Although the website says that it is for Amazon Go, Amazon Go Grocery, and Amazon Fresh, I found that they were able to handle inquiries related to any Amazon business. I spoke to a nice lady who understood my story and tried to refund the money to me, but I was a couple days shy of the 2-week mark after which the agent is authorized to issue a refund. Therefore, she asked me to call back in a couple of days. My phone interaction with Amazon was followed up with an email acknowledging the details of our conversation, and this exceeded my expectations. Additionally, instead of having to request a call from an Amazon representative, I was provided with Amazon’s customer service phone numbers which are staffed 24 hours a day, 7 days a week:

U.S. and Canada: 1-866-216-1072

International: 1-206-266-2992

I was also provided other options for contacting Amazon customer service:

Call: http://www.amazon.com/clicktocall

Chat: http://www.amazon.com/clicktochat

At the 2-week mark after I dropped off my package with UPS, I confirmed that the package was still in “Delay” status and had not reached its destination. Therefore, I dutifully called Amazon customer service and spoke to an agent. After a couple of brief holds, I was told that I should receive my refund within about 10 minutes, and within a few minutes I received both an email and text message confirming that the refund had been issued.

In summary, the root cause of the issues with the return were related to operations at UPS. Given my inability to resolve the issue through UPS in a timely manner, Amazon rose to the occasion and has kept me happy. This will definitely help Amazon retain me as a loyal customer.

Thursday, May 11, 2023

COVID-19 Exposure Notifications Turned Off

Today marks the end of the COVID-19 Public Health Emergency. The Department of Health and Human Services provides a fact sheet that describes what will change and what will remain the same. One thing I did not expect was that the California Department of Public Health would turn off exposure notifications.


An announcement on the California Department of Public Health website states, “As of May 11, 2023, the COVID-19 digital exposure notification systems across the U.S. are turned off. These systems were timed to shut down on the same date that the nation's COVID-19 State of Emergency ends.”

Friday, April 21, 2023

Facebook User Privacy Settlement


If you were a Facebook user in the United States between May 24, 2007, and December 22, 2022, inclusive, you may be eligible for a cash payment from a Class Action Settlement. Numerous lawsuits were brought on behalf of Facebook users who allege that Facebook (now Meta Platforms, Inc.) shared or otherwise made accessible to third parties (including but not limited to third-party app developers, “whitelisted” parties, business partners, advertisers, and data brokers) user data and data about users’ friends without permission of the users whose data was shared, and did not sufficiently monitor and enforce third-party access or use of that data.

The Facebook User Privacy Settlement is known as In re: Facebook, Inc. Consumer Privacy User Profile Litigation, Case No. 3:18- md-02843-VC (N.D. Cal.), and Facebook denies that it violated any law but has agreed to the Settlement to avoid the costs and risks associated with continuing this case. The only way to receive a cash payment from this Settlement is by submitting a timely and properly completed Claim Form that obtains approval from the Settlement Administrator. The Claim Form must be submitted no later than August 25, 2023.

If the Settlement is approved by the Court, Meta will establish a Settlement Fund of seven hundred twenty-five million dollars ($725,000,000.00) to pay all valid claims submitted by the Settlement Class Members, as well as notice and administration expenses, any attorneys’ fees and costs, and any Service Awards for the Settlement Class Representatives. Your payment will depend on how many Settlement Class Members submit valid claims and how long you were a user on Facebook during the Class Period.

Sunday, April 16, 2023

Download Someone Else’s Google Slides


In the past few years, my child’s school has hosted many meetings during which the presenters use Google Slides as a visual aid. When asked to share the slides, sometimes the presenters paste a Google Slides URL into the chat. Alternatively they may state that they will will post the slides on the school website or distribute the slides using other means—in my experience, the presenters don’t always follow up with their commitments. If you’re like me, when there is dense information on a slide deck, you might prefer to focus on the presentation instead of taking notes or screenshots of the slides. Therefore, having a copy of the slides can be very helpful. Here’s how to take matters into your own hands.

If you are provided with the Google Slides URL and if the owner has not restricted access, you can simply paste the URL into a browser to open the slide deck. From there, click File > Download and then select your desired file format (.pdf, .pptx, etc.) to initiate the download. Note that the slide deck owner may not have restricted editing privileges, but it would be common etiquette to not alter any of the contents.

What if you are not given access to the URL? One sneaky way to obtain a URL is to pay attention to the presenter as they prepare to put their Google Slides into presentation mode. Usually the presenter will begin screen sharing (e.g., via Zoom, Teams, or other conferencing application) before sharing their slides. When the presenter reveals the Google slides in their web browser, take a screenshot while the URL is present. If you have a modern macOS operating system, opening the screenshot in Preview will allow you to simply click the URL within the screenshot, because Preview tries to recognize URLs and make them clickable. Preview might have a hard time distinguishing between a capital “I” and a lowercase “L” so you might need to play around with the URL a little bit, but you should eventually be able to figure out the correct URL. The only downside here is that the presenter may have restricted access to the file, so even if you have the correct URL, you might not be able to open the file.

A second sneaky way to obtain a URL is when the Google Slides presentation is embedded into a web page. From your web browser, you can try to show the page source and skim the HTML for the URL. On Safari, you can also use the Web Inspector for this same purpose. Note that both of these functions in Safari requires that you enable the Developer tab from your Preferences settings.

A third sneaky way to obtain a URL is to visit https://docs.google.com/presentation/u/0/ where recently viewed presentations will be listed. This won’t work for presentations you’ve viewed via screen sharing, but if you’ve clicked on a Google Slides presentation while logged in to your Google account, it may be listed here. If so, you can open the Google Slide presentation and download away.

I’d also like to mention that once you obtain the URL of a Google Slides document, you can also construct a URL to directly download the file. The URL syntax of a Google Slides presentation is as follows:

https://docs.google.com/presentation/d/PRESENTATION_ID/edit

Once you have the PRESENTATION_ID, simply plug it into one of the following URLs to download the slides in .pdf or .pptx format:

https://docs.google.com/presentation/d/PRESENTATION_ID/export/pdf
https://docs.google.com/presentation/d/PRESENTATION_ID/export/pptx

Visit this blog for more Google Drive URL tricks that pertain to not only Google Slides but also Google Docs and Google Sheets. 

Monday, April 10, 2023

Caption Your Phone Calls with Olelo

If you have a family member or friend who is experiencing hearing loss, and that person is finding it difficult to carry on a phone conversation, then consider trying a phone captioning app called Olelo. Olelo helps people with hearing loss by captioning in real time every word as it’s spoken during a phone conversation.

The app is available for iOS and Android users, and it is free to use for qualified users with hearing loss. Olelo uses Internet Protocol Captioned Telephone Service (IP CTS) which is a form of telecommunications relay service (TRS) that permits an individual who can speak, but who has difficulty hearing, to use a phone to simultaneously listen to the other party and read captions of what the other party is saying. Unlike some services that use live transcriptionists, Olelo uses voice recognition technology to automatically transcribe spoken words into text. An IP CTS Consumer Guide describes the technology in more detail.

The FCC IP CTS program has a mandate to ensure functionally-equivalent phone service for the deaf and hard-of-hearing and compensates Olelo for the services they offer, thereby allowing Olelo to be used for free. Olelo provides answers to frequently asked questions, so check it out if you think it could help someone with hearing loss.

Sunday, April 9, 2023

Revert to Previous Version of ETT

Eleven Table Tennis (ETT) is an amazing virtual reality table tennis game for Meta Quest. It features very realistic physics and modes where you can play against the computer or other humans in real time (or near real time as I describe here).

In December 2022, the ETT developers introduced avatars to the game, and the new release was accompanied by so many issues that negatively impacted gameplay that they issued an emergency roll back to the prior version.

Several days ago, the ETT developers issued another update, again with avatars, with many of the gameplay issues remedied. However, I did not like the update because the screen would glitch frequently during a match, and my avatar’s arms would sometimes appear on the screen despite me toggling the setting to display the avatar only to my opponents. I understand why the developers want to introduce avatars, but I still consider this newest release to be a downgrade. Many players on the Eleven Table Tennis Facebook Group have expressed similar complaints. In that forum, I learned how to revert the app to a previous version. Here’s how:

1. Launch the Quest app on your smartphone

2. Launch the Store

3. Navigate to the app (in this case, Eleven Table Tennis)

4. Scroll down to the Version and tap on it


5. Tap “Channel”

6. Select the version you want to revert to


Next time you use your Quest headset, you should be notified that there is an update to the app. Install the update. This should install the version that you selected.


Hope this helps!


Saturday, April 8, 2023

Make Your Tesla Fart

I discovered a “Fart” feature on my Tesla app, as pictured on the upper right corner of the icon library (whose icons can be repositioned):

Tapping the “Fart” icon results in the Tesla playing a variety of fart noises through its exterior speakers. Some are short, and some are long, but all of them are entertaining. Similar to eating Lay’s potato chips, nobody can resist the urge to tap the icon just once.

In 2021, Tesla featured a pretty extensive fart menu in Emissions Testing Mode. It featured 6 different fart sounds that could be triggered on demand or when using the turn signal. Apparently it could also be instructed to play the sound from a specific seat.

In 2022, Tesla allowed users to replace its horn with fart and other noises with its ‘Boombox’ feature and was ordered by the National Highway Traffic Safety Administration to disable those noises because pedestrians are less likely to be able to hear them. Details are provided in this CNN story and NHTSA Safety Recall Report.

The current fart noise feature does not replace the horn sound so does not compromise the pedestrian warning system. If you’re like me, you’ll appreciate that there is now a safe and legal way to make your Tesla fart. Now if you’ll excuse me, I need to light a match.

Friday, March 31, 2023

Backing Up Your Data

Today, March 31, is World Backup Day. It’s a reminder for all of us to back up our important files. I am backing up my photos, videos, and personal documents as I write this blog, and I try to back up my files on a monthly basis.

My current process is to back up my files onto 2 external hard drives, each of which has 8 TB of storage capacity, which is currently sufficient to store all of my files. However, I recently learned about the “3-2-1 Plan” which is described at the U.S. Chamber of Commerce website and in many other online sources. In summary, you should have:

  • 3 copies of your data
  • 2 different kinds of media for your backups
  • 1 backup copy that is offsite

The idea behind the 3-2-1 Plan is to diversify your backups to avoid having a single point of failure. For example, you could have 3 copies of your data, but if they are all in 1 place and there is a fire, flood, or theft, then that single event could potentially destroy all of your data despite you having backups.

Admittedly my backup approach does involve 3 copies of data (internal SSD and 2 external hard drives) and 2 kinds of media (if you count SSD and hard drives as being “different” kinds of media), but I do to have 1 backup copy that is offsite. For many years I have contemplated bringing 1 of my 2 external hard drives to my parents’ house each time I visit them, but I have never executed on that plan. Maybe it’s time for the to re-think my approach.

How well does your backup plan stack up against the 3-2-1 plan?

Thursday, March 2, 2023

Visible Wireless Network “Upgrade”

I was recently notified by my wireless provider, Visible, that a network upgrade was “required to improve your service” and that the upgrade would result in a “faster, more reliable network” for the same price.

All three of our family members use Visible, we all requested the upgrade, and we were all sent new SIM cards. My wife and I installed our new SIM cards and simultaneously attempted to activate our phones on the new Visible network. Unfortunately neither of our phones successfully activated, so we were stuck without cellular service for almost a full day.

After several hours of futile activation attempts, I contacted Visible using their chat service which is the only way they provide customer support. On my first attempt, I was queued for about an hour and watched the progress bar slowly make its way to 100%, at which time I was supposed to be connected to a chat agent. Unfortunately something went wrong, and instead of connecting me to an agent, the chat box froze so I had to abort. On my second attempt, I waited another hour and this time was successfully connected to a chat agent. The chat conversation was horribly slow. Each time I entered a response, the agent would take 30-60 seconds to reply and often provided generic answers such as “Thank you” or “I’ll look into that” or other seemingly canned responses. It also felt to me like the agent was trying to help multiple customers at the same time due to the slowness of the replies. Anyway, after spending an hour on the chat line, I was finally told that there was some kind of outage on the Visible side (not Verizon which is the actual network that Visible customers use), that they were trying to fix it, and to try activating again the next day. I was also credited $5 toward my next monthly payment for all my troubles (admittedly this probably added 10 minutes to my total chat time). My wife and I did both successfully activate our phones the next morning.

Then it occurred to me that I should put Visible’s claim of a faster network to the test. Since I had not yet activated my daughter’s phone on the new network, I decided to do some speed comparisons using the iOS Speedtest app. I’ll admit that I could not conduct a completely fair head-to-head comparison because I was pitting my iPhone 12 Pro Max (which I’ll refer to as “12”) on the new Visible network against my daughter’s iPhone X (“X”) on the old Visible network.

My first thought was to perform a series of “control” speed tests where I measured download (“D”) and upload (“U”) speeds with both phones connected to our home Wi-Fi (provided by Spectrum). For all tests, both phones were placed next to one another so they were equidistant from the router, and I initiated the speed tests on both phones at the same time. The results showed similar speeds on both phones, with slightly faster speeds on 12 vs. X which might be attributable to the faster processor on 12 (I am guessing here).

Control: Both Phones Using Home Wi-Fi
Run12 D (Mbps)X D (Mbps)12 U (Mbps)X U (Mbps)
133.8135.004.173.34
242.8234.063.193.09
342.2934.363.203.25
Average39.6434.473.523.23

The next thing I did was to test 12 (using new Visible LTE) against X (using old Visible LTE). Since my 12 is capable of 5G, but X can only use LTE, I had to change the cellular setting on 12 to use LTE only. I was pleased to see that I saw faster speeds on 12 than X, and the difference was greater than the observed difference in Wi-Fi speeds, so in other words the faster speed on 12 may not be explained by the hardware difference alone.

Comparison: 12 (New Visible LTE) vs. X (Old Visible LTE)
Run12 D (Mbps)X D (Mbps)12 U (Mbps)X U (Mbps)
418.3611.137.335.04
538.4326.3010.137.42
627.4412.807.526.45
Average28.0816.748.336.30

Next, I installed the new SIM card on X and successfully activated the phone right away. Then I re-ran speed tests on 12 and X, with both phones using the new Visible LTE network. Surprisingly, I observed more or less the same speeds on both phones. Because I saw wide variability in download speeds on both phones with different runs, I performed 5 runs on each phone (instead of 3 like I did before). In any case, with this small sample size, I saw no convincing evidence that the network upgrade yielded faster speeds on X—about 17 Mbps download and 6 Mbps upload on both the old and new Visible networks.

Comparison: Both Phones Using New Visible LTE
Run12 D (Mbps)X D (Mbps)12 U (Mbps)X U (Mbps)
716.6514.488.547.22
829.8022.956.705.35
944.5313.737.035.62
1010.9125.036.255.30
1112.1228.447.834.10
Average30.3317.057.426.06

For good measure, I re-ran my control comparisons with both phones using home Wi-Fi, and results were very similar to my initial control run.

Control: Both Phones Using Home Wi-Fi
Run12 D (Mbps)X D (Mbps)12 U (Mbps)X U (Mbps)
1235.5038.750.891.21
1345.4231.295.402.29
Average40.4635.023.151.75

In conclusion, I was disappointed to not see any significant speed improvement on the new Visible network. Even though the 12 vs. X comparison was not a fair head to head comparison, the speeds on X were similar on the old and new Visible LTE network. A limitation of this experiment is that I only compared LTE speeds because X is not capable of 5G. It is possible that the new Visible network is in fact faster than the old network in 5G connectivity, but I did not see that in fine print anywhere, nor was I able to directly test that hypothesis.

This reminds me of a similar experiment that I conducted a couple years ago when I conducted a Comparison of 4G and 5G Cellular Networks.